Force Sensors
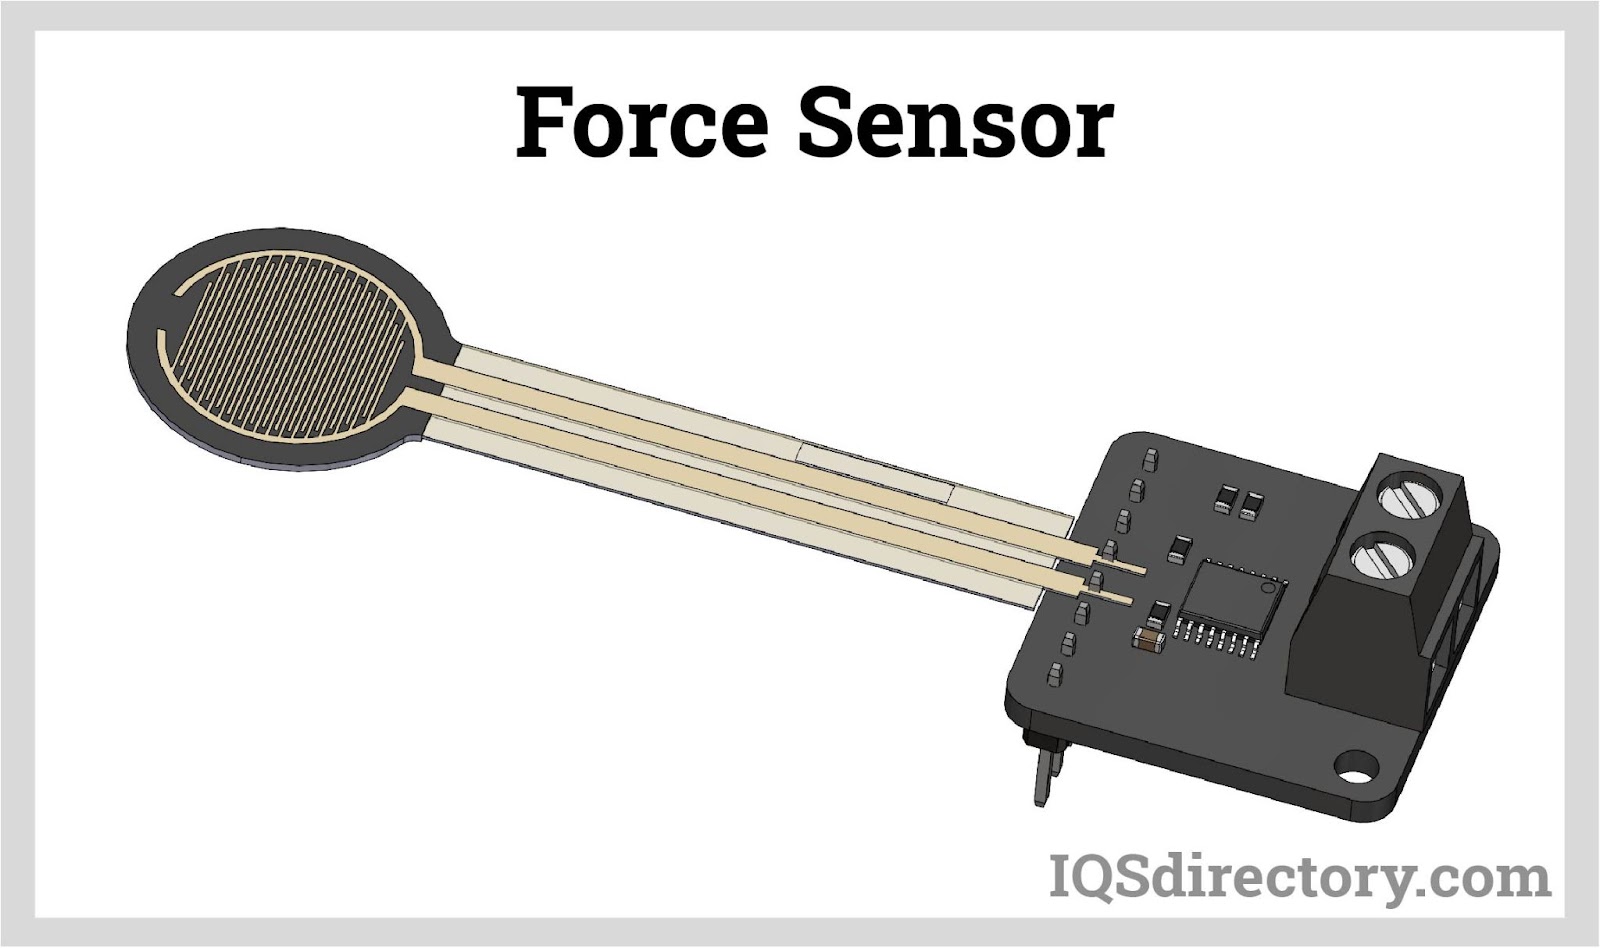
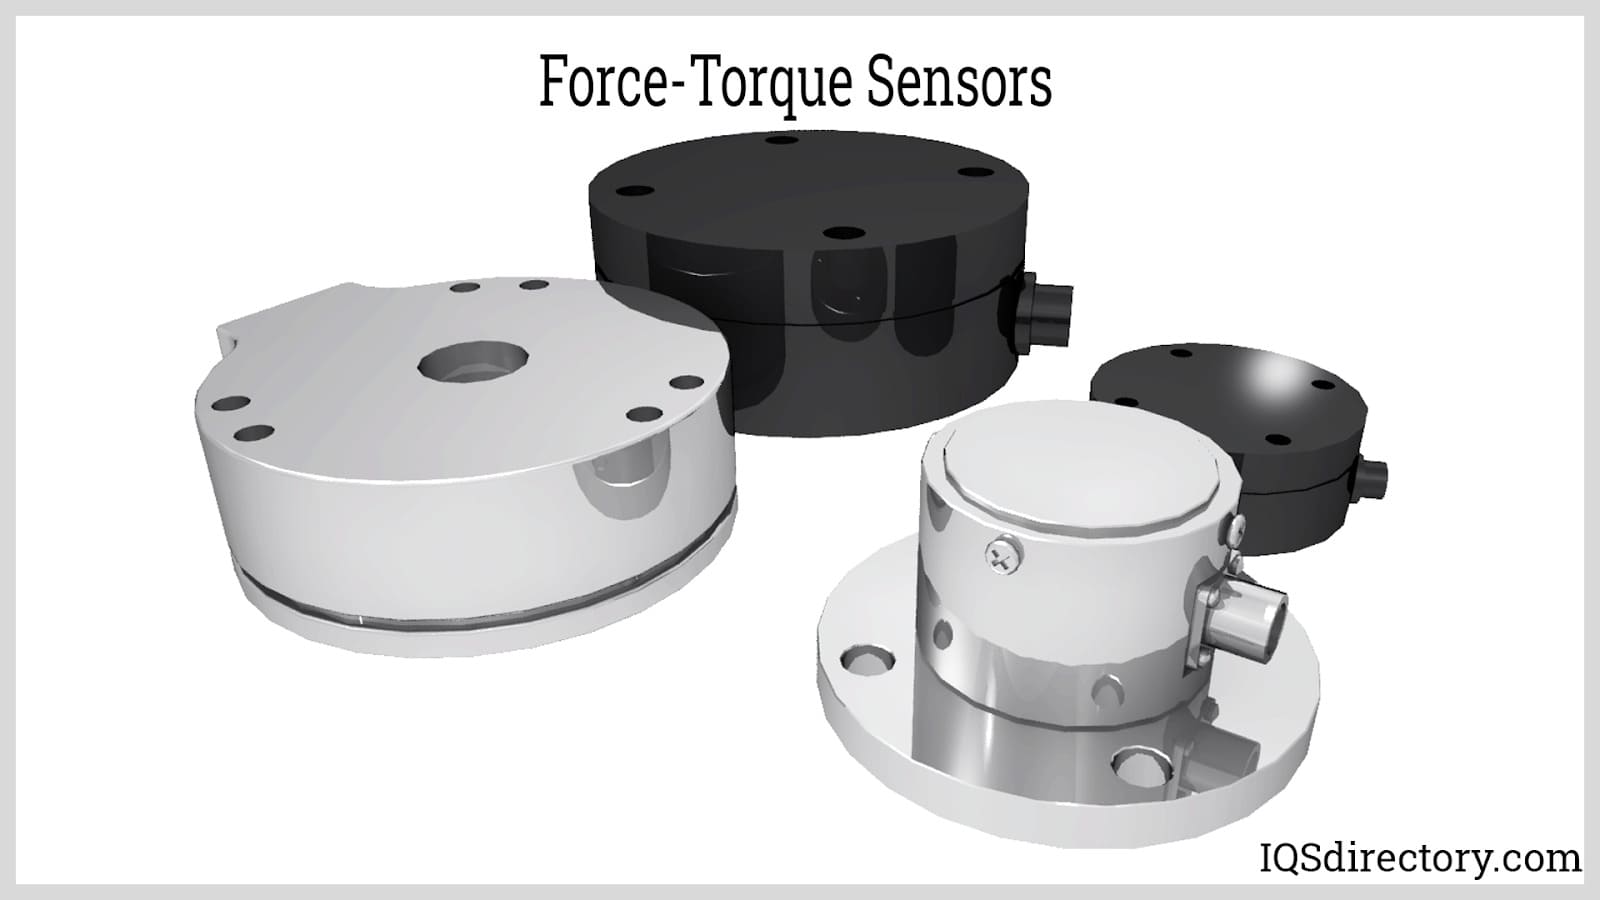
Force sensors are transducers that transform mechanical input forces like weight, tension, compression, torque, strain, stress, or pressure into an electrical output signal whose value can be used to...
Please fill out the following form to submit a Request for Quote to any of the following companies listed on Strain Gauges .
This article provides a detailed look at strain gauges.
Read further to learn more about topics such as:
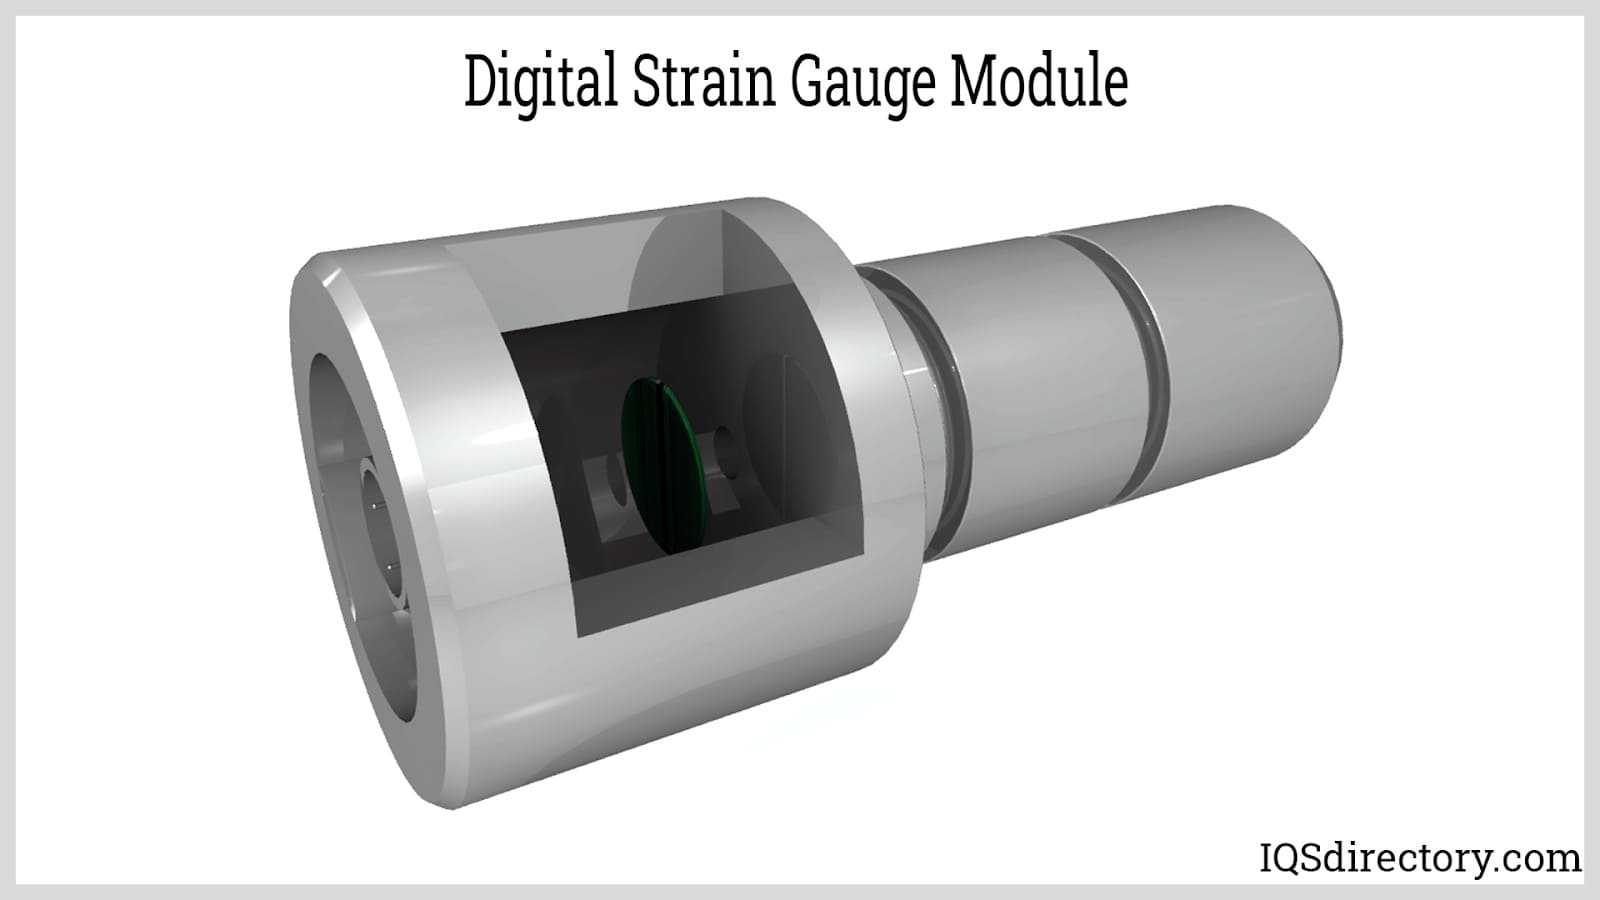
A strain gauge acts as a sensor that measures resistance changes due to an applied force, translating these changes into quantifiable data. It features a delicate metal conductor foil mounted on a flexible backing material known as the carrier. Electrical wires are soldered to this foil, permitting current passage through the strain gauge. As the measured surface elongates or contracts, the strain gauge deforms in tandem, causing resistance fluctuations that reflect dimensional changes in the surface.
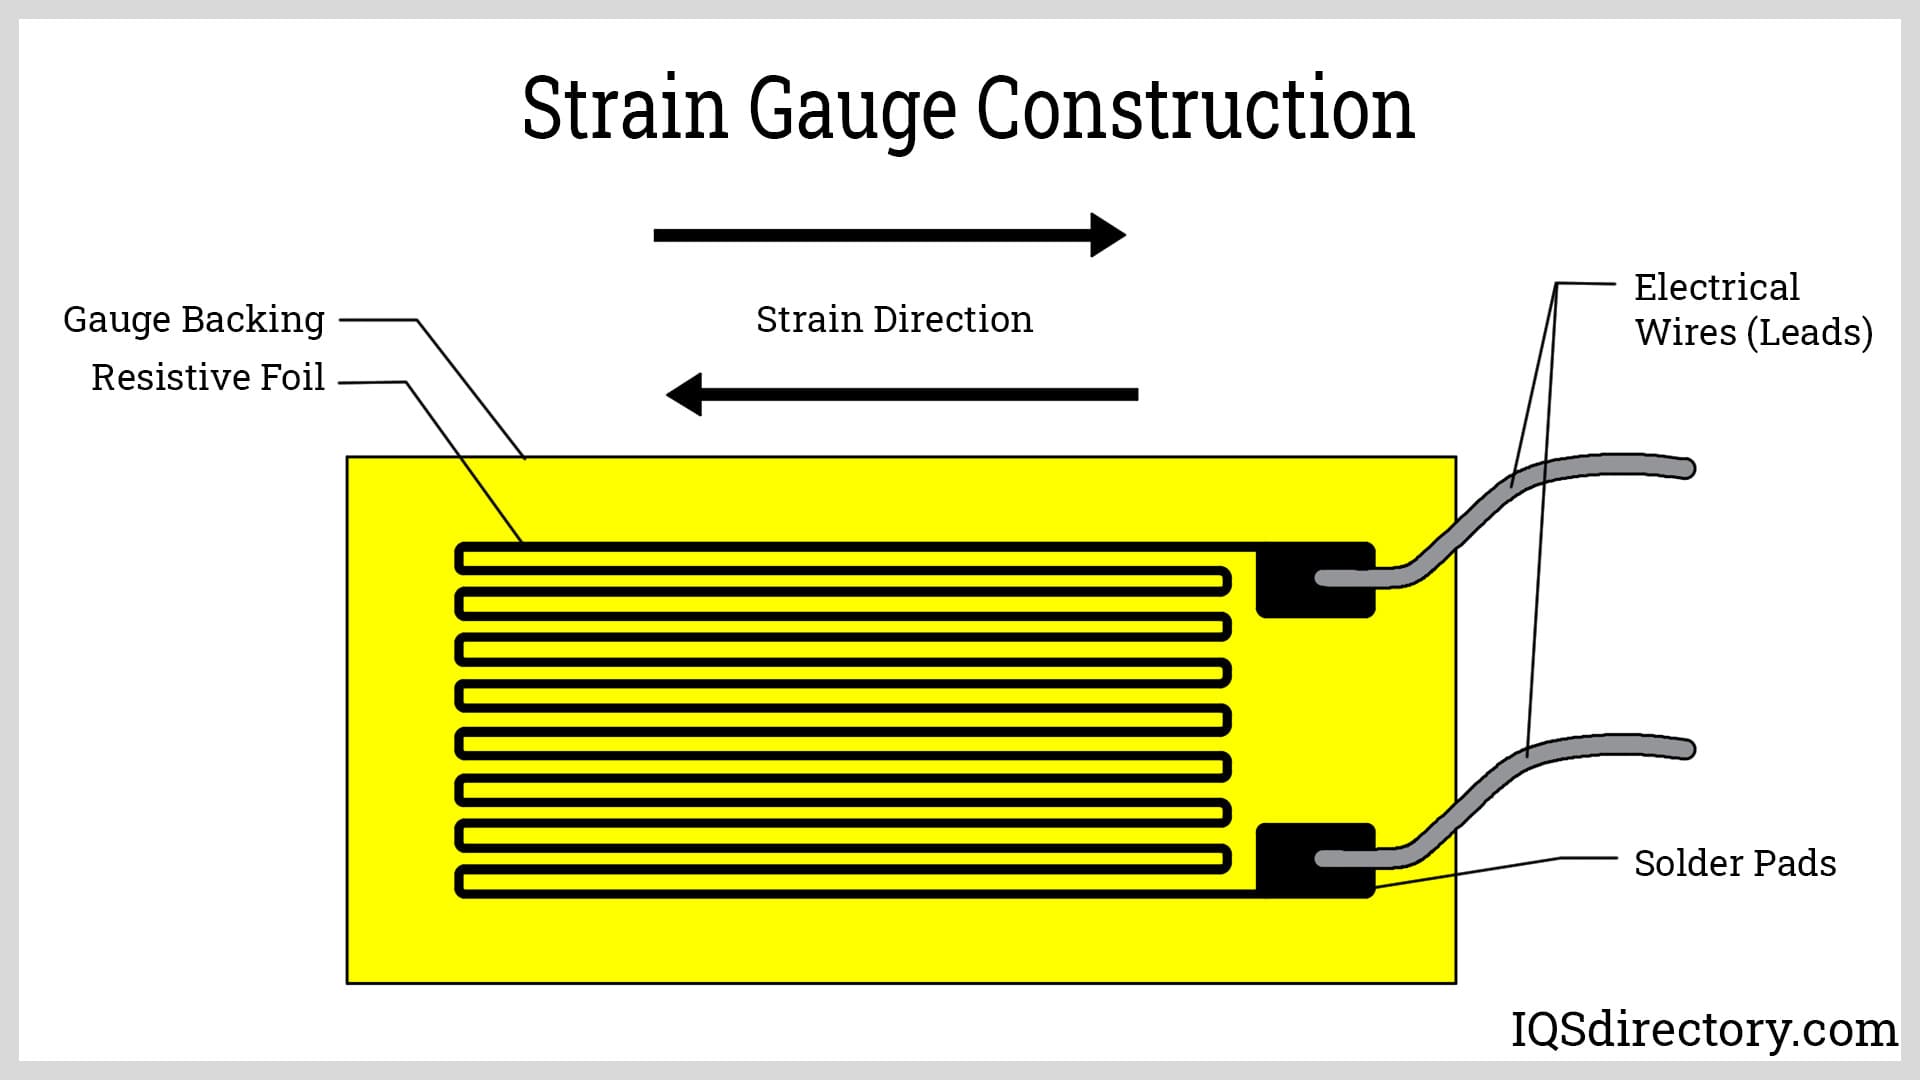
The process of using a strain gauge begins with mounting it on the object to be evaluated. When a force acts on it, the strain gauge assesses the resulting deformation, which may involve elongation, stretching, compression, or other changes due to tensile or compressive forces, translating into detectable resistance variations.
Strain gauges are adept at sensing various stress forms, including tensile, compressive, bending, torsional, and shear stresses. They are sensitive enough to identify the most minute alterations in an object's shape. Since the resistance change they register is extraordinarily subtle, strain gauges employ ultra-thin metallic strips to precisely detect these minute resistance shifts.
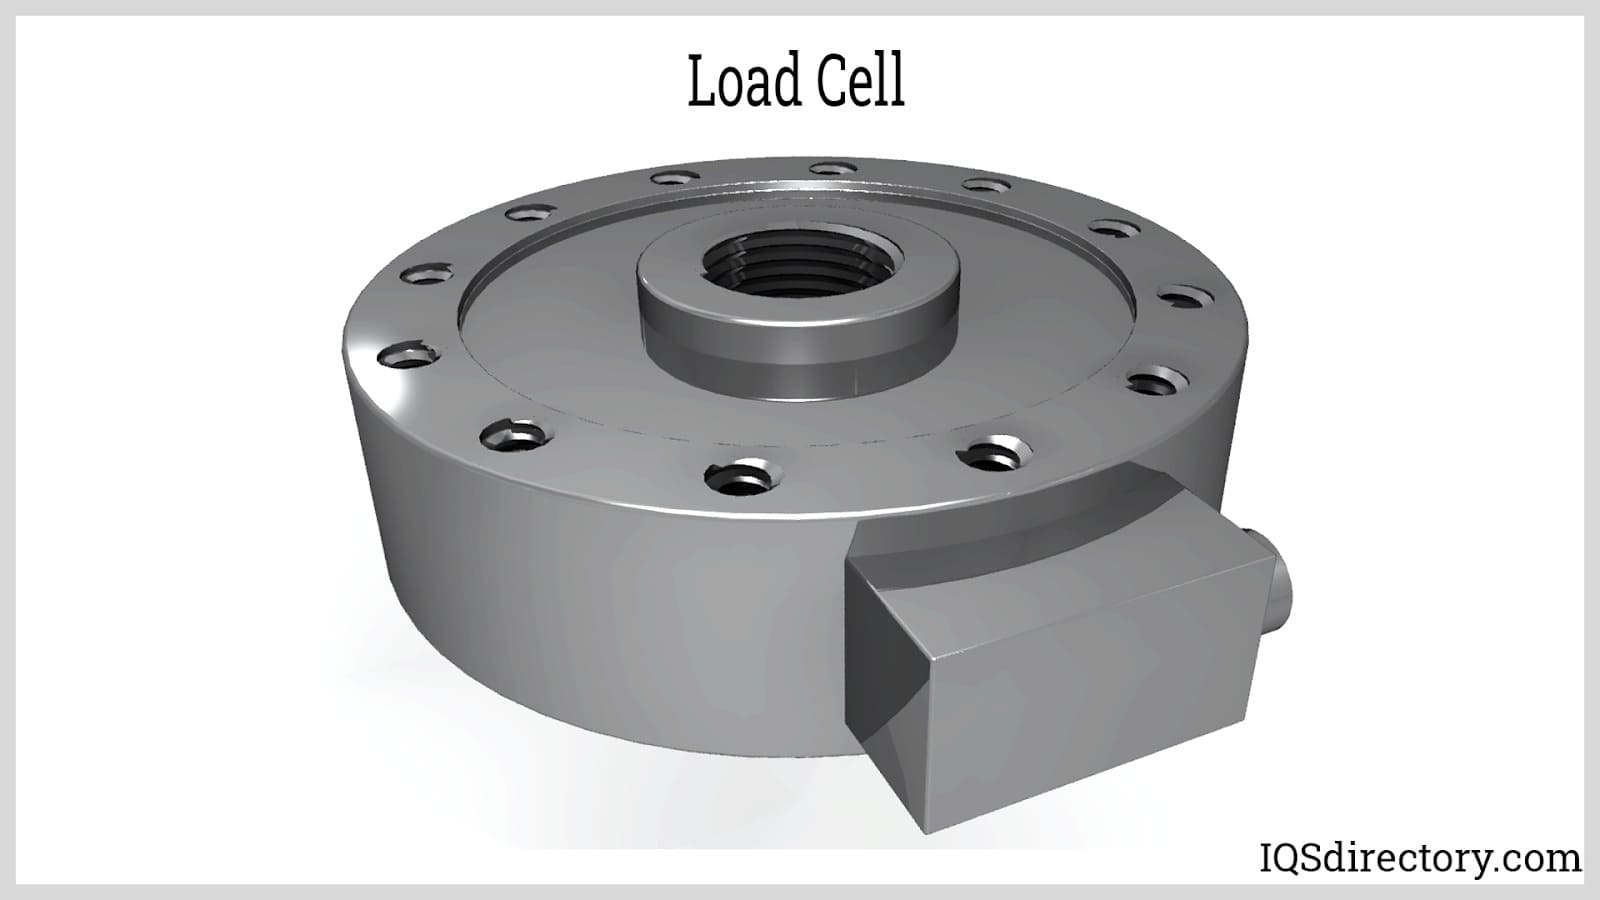
The primary use of strain gauges is in manufacturing force and pressure transducers like load cells, which are transducers that gauge the mechanical load on an item by converting it to electronic signals that can be easily interpreted. Load cells employing strain gauges are the dominant load cell type and are predominantly used to measure weight.
In weighing scenarios, strain gauge load cells are affixed to a structural member that deforms under applied weight. Contemporary load cells often combine several strain gauges to increase measurement precision. Apart from weight assessment, strain gauge load cells find use in automation, process control, biomechanics, equipment monitoring, structural integrity evaluation, bulk material weighing, testing, and quality assurance. The enhancement of this technology was pioneered by William Thomson in 1856.
The development of strain gauges marked a turning point in the field of mechanical and structural measurement. The early history of strain gauges is closely tied to the Wheatstone bridge circuit—an essential component in precision measurement techniques. Invented and popularized by Charles Wheatstone in 1843, the Wheatstone bridge enabled accurate measurement of small resistance changes, a fundamental principle behind strain gauge operation. Wheatstone's advancements laid the groundwork for future developments in stress and force measurement instruments. This core concept of detecting electrical resistance variations due to mechanical stress was further refined by William Thomson (later known as Lord Kelvin) in 1856, establishing the theoretical basis for strain gauge technology.
By the early 20th century, significant progress was made in bringing the strain gauge from concept to practical use. In 1938, Edward E. Simmons, an electrical engineer from the California Institute of Technology, created one of the earliest practical resistance strain gauges. Utilizing thin resistance wires intricately woven with silk threads, Simmons’ prototype was the first to successfully measure microstrain and tensile forces. He affixed the woven strain gauge to a steel cylinder and precisely measured force impulses resulting from a pendulum ram impact. This marked a pivotal advancement in experimental stress analysis, structural testing, and calibration of engineering materials.
Concurrently, Arthur C. Ruge, a mechanical engineer and geophysicist at the Massachusetts Institute of Technology (MIT), independently developed a similar sensor to measure mechanical strain and stress in his seismic model of an earthquake-resistant water tank. Ruge’s approach used extremely fine wires attached to a strip of paper, forming a simple, robust strain gauge that was easily affixed to a bending beam or structural component under test. This innovation not only facilitated accurate deformation measurements but also paved the way for the modern bonded resistance-type strain gauge used in various load cell, force sensor, and torque sensor applications today.
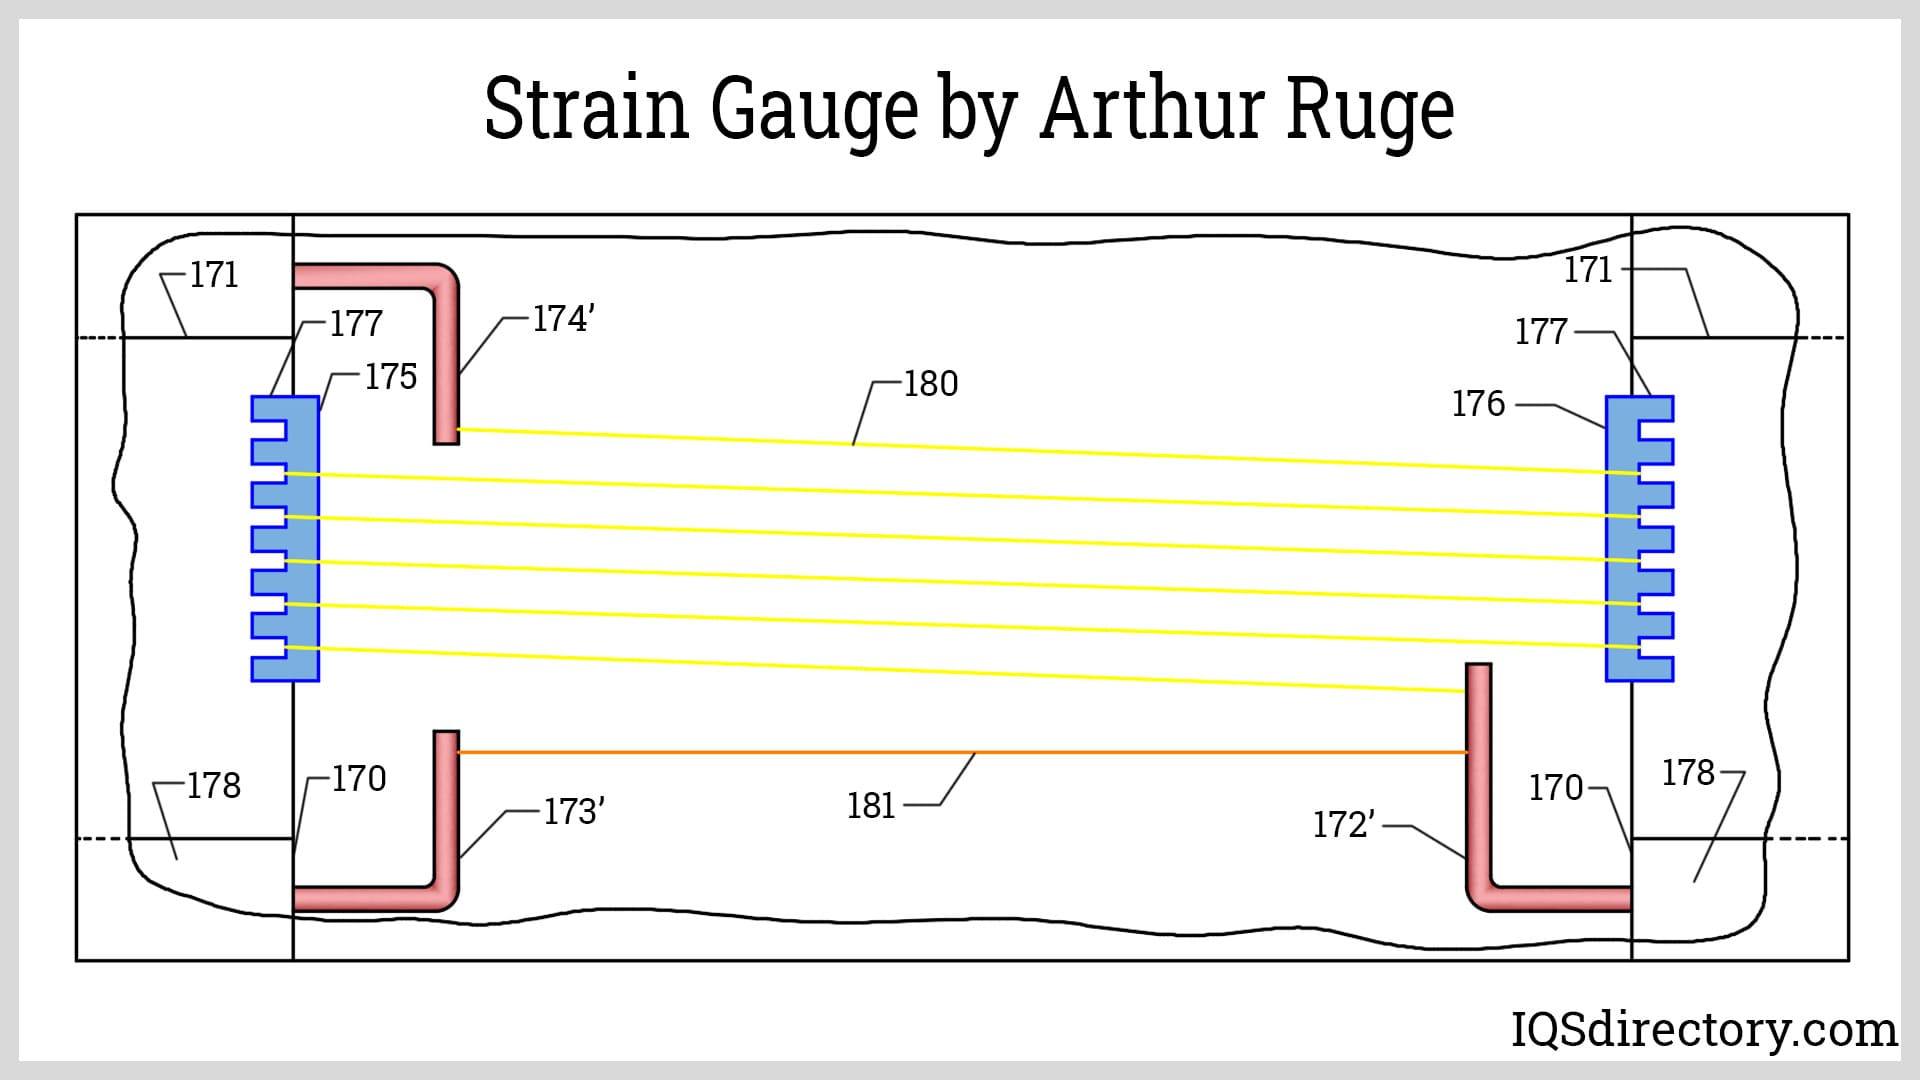
The cooperation between academic research and industrial manufacturing in the following years significantly advanced strain gauge technology. Ruge and his team at MIT quickly transitioned their invention into commercial production, fueling widespread adoption in testing laboratories, quality assurance, structural health monitoring, and process automation. Over time, the design of the strain gauge carrier and circuit became increasingly refined with the introduction of modern materials and innovative fabrication processes. Today, contemporary manufacturing leverages photolithography, chemical etching, and precision circuit printing—techniques that have replaced traditional wound-wire and foil patterns—to produce high-sensitivity, reliable strain gauges for aerospace, automotive, civil engineering, and industrial automation applications. These developments have also enabled the integration of strain gauges into complex sensor arrays for multi-axis force measurements, real-time data acquisition, and predictive maintenance systems.
Furthermore, users seeking strain gauge solutions will find a broad spectrum of options optimized for different needs, including customized foil strain gauges, semiconductor strain sensors, thin-film, and MEMS-based (Micro-Electro-Mechanical Systems) gauges. When selecting a strain gauge, factors such as gauge factor, temperature compensation, resistance value, adhesion methods, and compatibility with data acquisition systems are key considerations for achieving precise, long-term measurement results. Leading manufacturers now offer a full range of strain gauge products, calibration services, and turnkey sensor solutions designed for research, industrial, medical, and OEM instrumentation purposes.
Several physical phenomena—including temperature variation, mechanical strain, and photo illumination—can influence the electrical resistance of a conductor. These factors play a critical role in sensor technologies and industrial measurement systems. Force transducers, such as high-precision load cells, make use of advanced strain gauge technology to exploit the direct relationship between mechanical deformation and changes in electrical resistance. By leveraging these principles, manufacturers can create highly sensitive and accurate devices for measuring force, weight, and pressure in a broad spectrum of engineering applications.
Every structural component and material is subjected to various forms of loading when exposed to motion, external forces, or operational conditions. Determining whether a component or assembly can safely withstand applied forces requires a thorough understanding of mechanical stress and strain behaviors. Strain gauges serve as indispensable force measurement tools, delivering precise strain readings essential for real-time monitoring, structural testing, and performance validation. Integrating strain gauges into load cells or force sensors provides engineers with the reliable data needed to predict mechanical failure, detect material fatigue, and ensure long-term product reliability and safety.
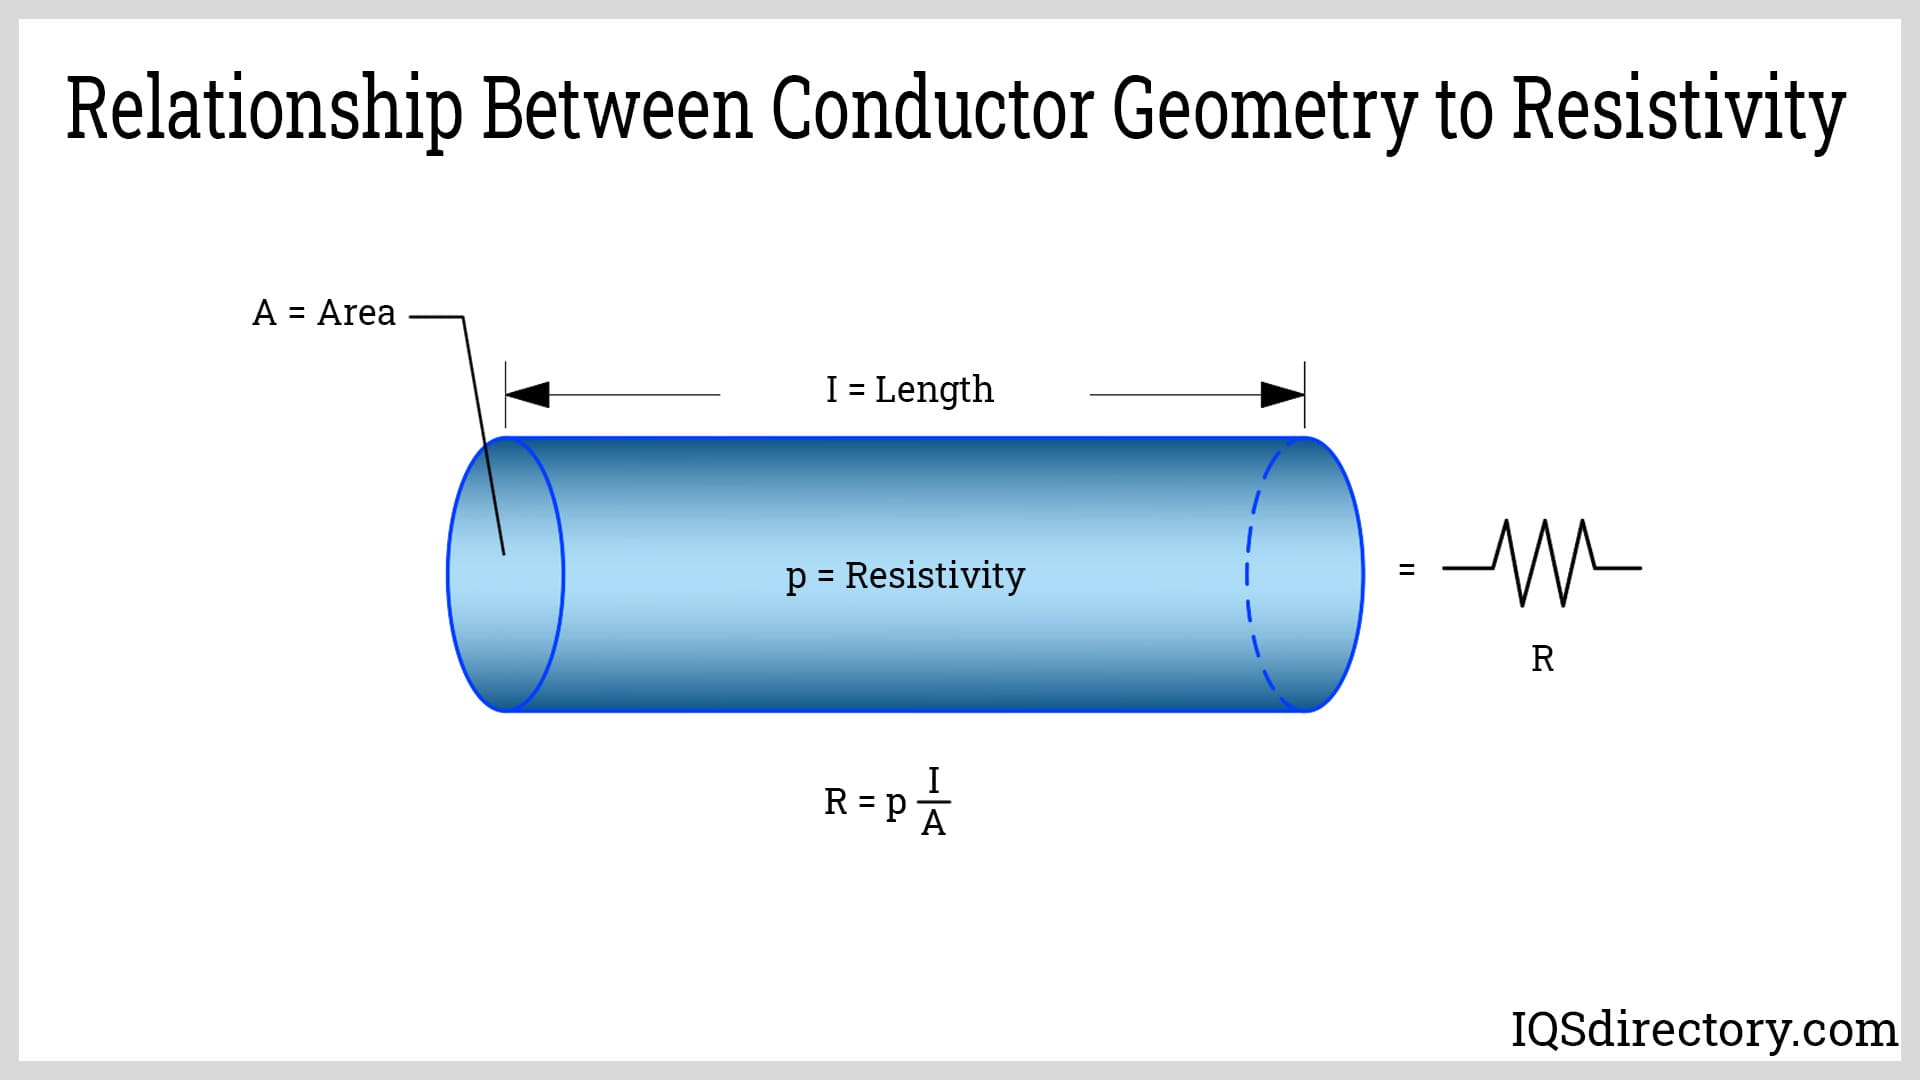
The electrical resistance of a metallic wire—commonly constructed from materials such as constantan or nichrome—is determined by two geometric factors: wire length and cross-sectional area. According to Ohm's Law and fundamental resistivity concepts, resistance increases linearly with the wire’s length and decreases as its cross-sectional area grows. When a strain gauge sensor is elongated due to mechanical loading, its conductive path lengthens while the cross-section narrows, resulting in a proportional increase in electrical resistance. In contrast, compressive forces shorten the wire and increase the area, causing resistance to decrease. This fundamental property underlies how strain gauges transduce mechanical motion into quantitative electrical signals, making them vital for stress analysis, structural health monitoring, and load measurement.
To convert these resistance changes into easily measurable electrical signals, strain gauges are typically implemented within a Wheatstone bridge circuit—a standard configuration in precision instrumentation. The Wheatstone bridge consists of four resistors and a stable direct current (DC) excitation source. Within the bridge, the strain gauge acts as the variable resistor; the remaining three resistors are held at constant values for accurate reference. This circuit topology is favored in load cell design, pressure sensors, and torque sensors due to its ability to detect minute resistance shifts—thus enabling high-resolution force and deformation measurements.
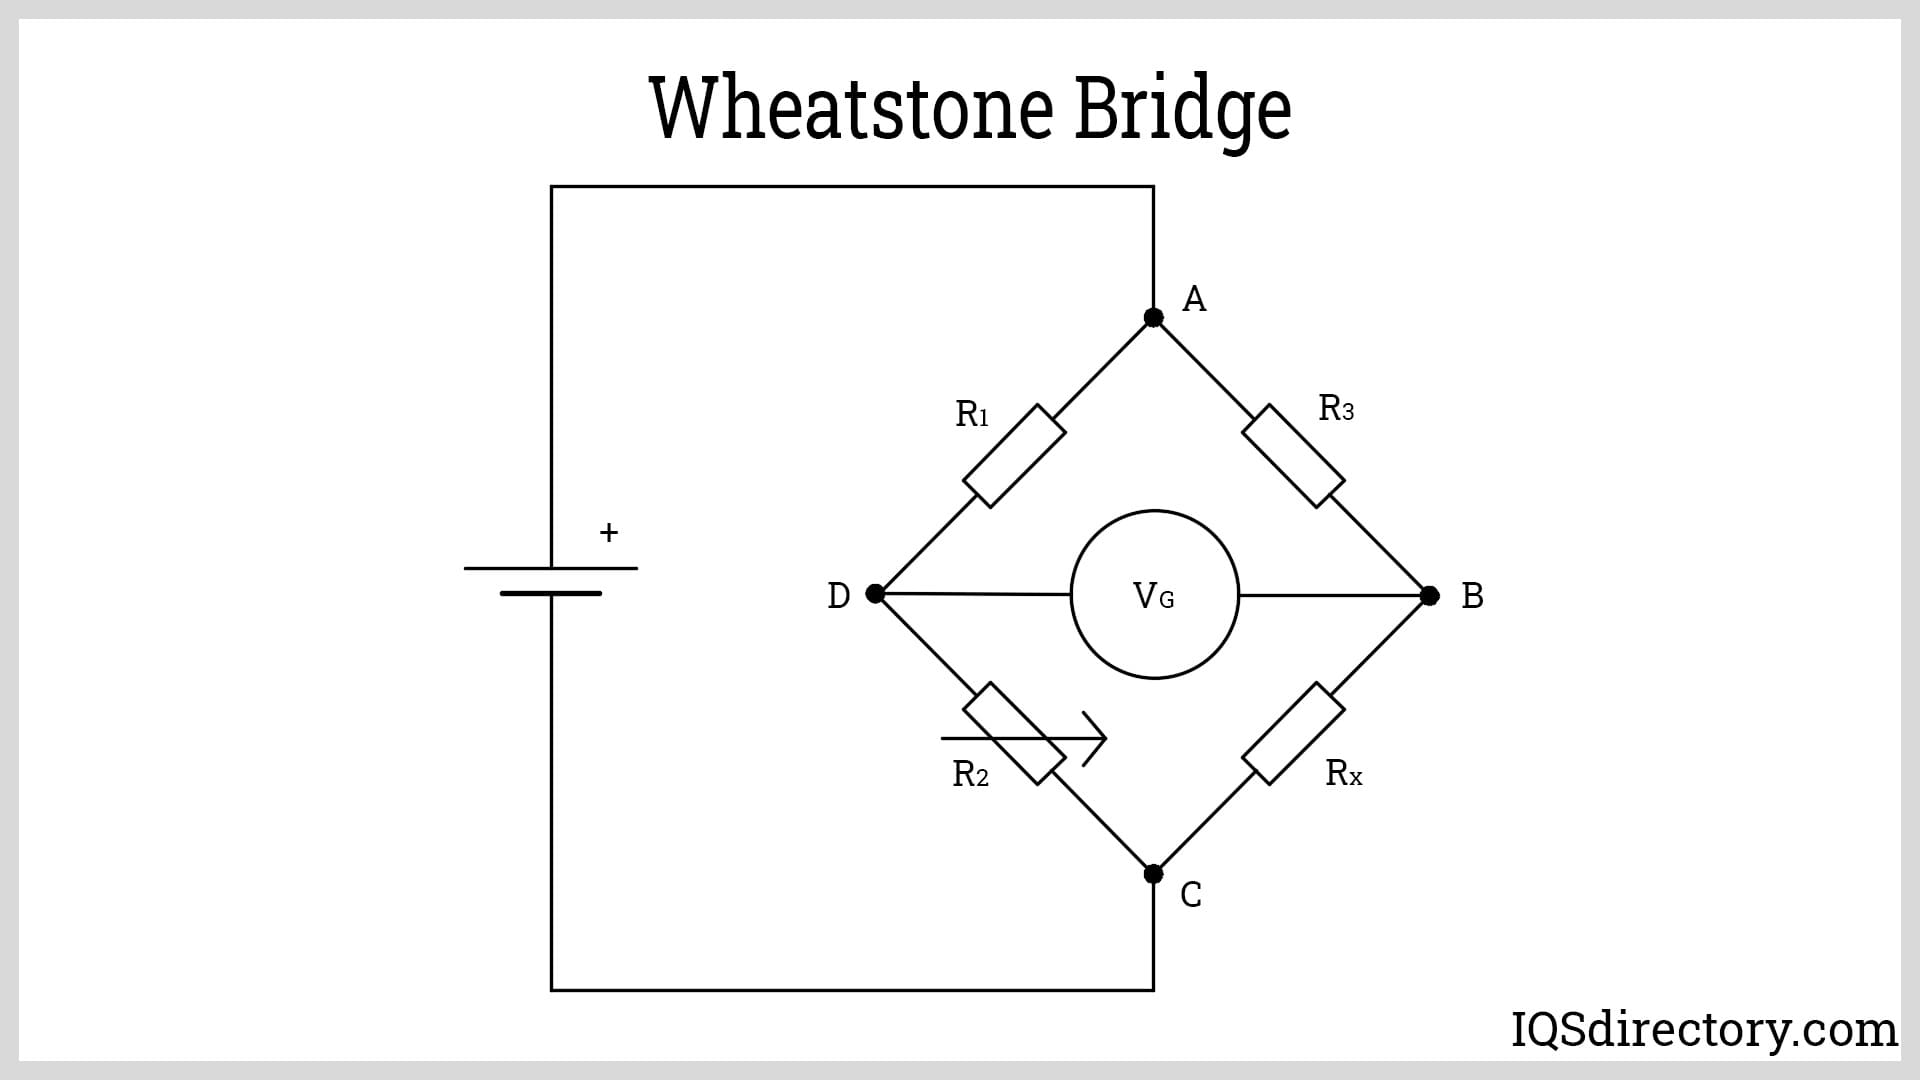
The Wheatstone bridge provides a differential output voltage, measured between two points commonly referred to as Vg (bridge voltage). When no external strain is applied, the bridge is balanced, yielding a zero-voltage output. However, applying force or deformation causes the resistance of the strain gauge to change, resulting in an imbalance and producing a linear change in the output voltage. This precise voltage shift is easily detected and interpreted using signal conditioning electronics, offering engineers a reliable method for continuous load, weight, or structural monitoring. The combination of strain gauges and Wheatstone bridge circuitry is fundamental for modern electronic weighing scales, industrial automation, and process control systems, ensuring consistent product quality and safety in demanding environments.
Understanding the operating principle behind strain gauges and Wheatstone bridge circuits is crucial for anyone evaluating or specifying force measurement solutions. When considering different types of load cells or force transducers, it’s important to assess factors such as gauge material, gauge factor sensitivity, linearity, and temperature compensation, along with the integration of sensing technologies within the application environment. This enables users to select the most appropriate force measurement equipment to optimize precision, durability, and performance across diverse industrial and research settings.
Strain gauges are classified based on their bridge configuration. A basic load cell or force transducer typically employs a single strain gauge and uses a quarter-bridge configuration. For enhanced performance, most designs incorporate either two or four strain gauges. Systems with two strain gauges are known as half-bridge configurations, while those with four strain gauges are referred to as full-bridge circuits.
The Wheatstone bridge configuration described earlier is known as a quarter-bridge circuit. In this setup, a single active strain gauge serves as the variable resistor. Because only one strain gauge is employed, it measures only one type of strain and is therefore the least sensitive among the different configurations.
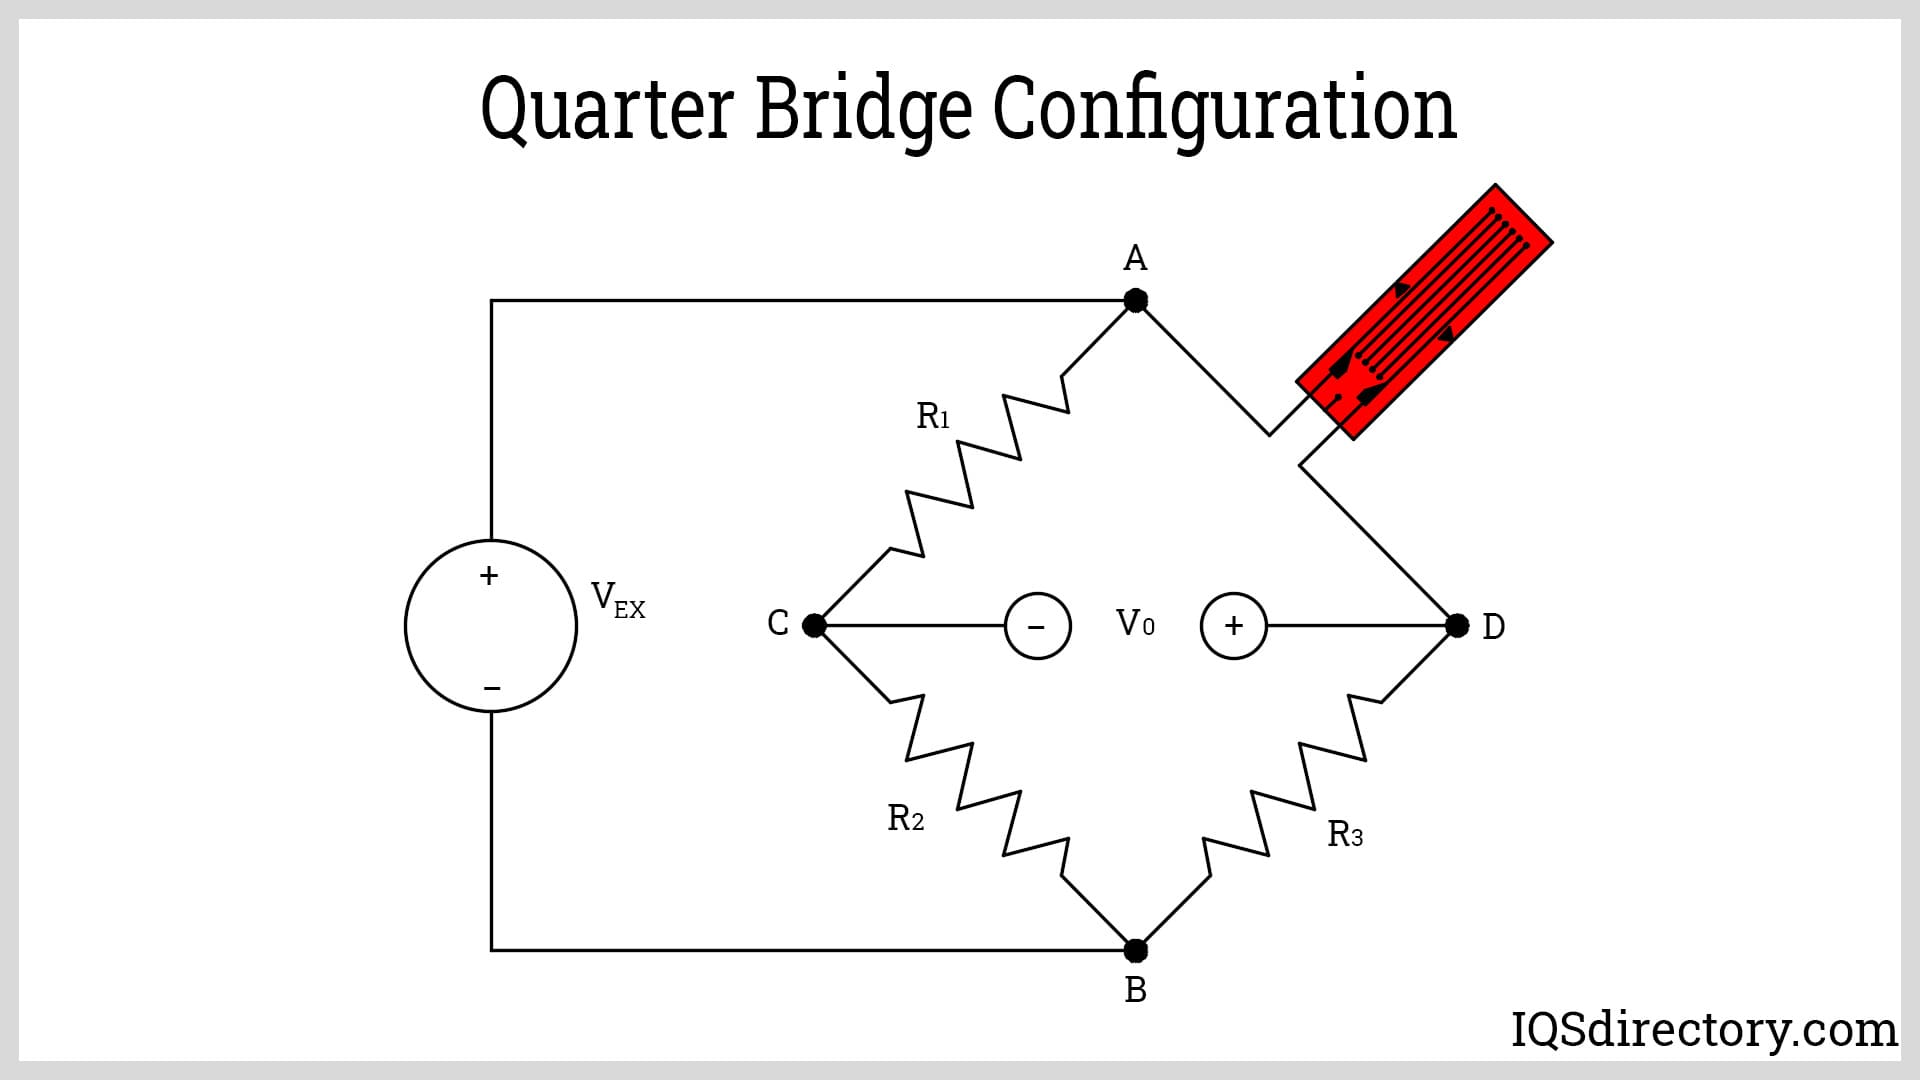
Quarter-bridge circuits can be further categorized into two configurations.
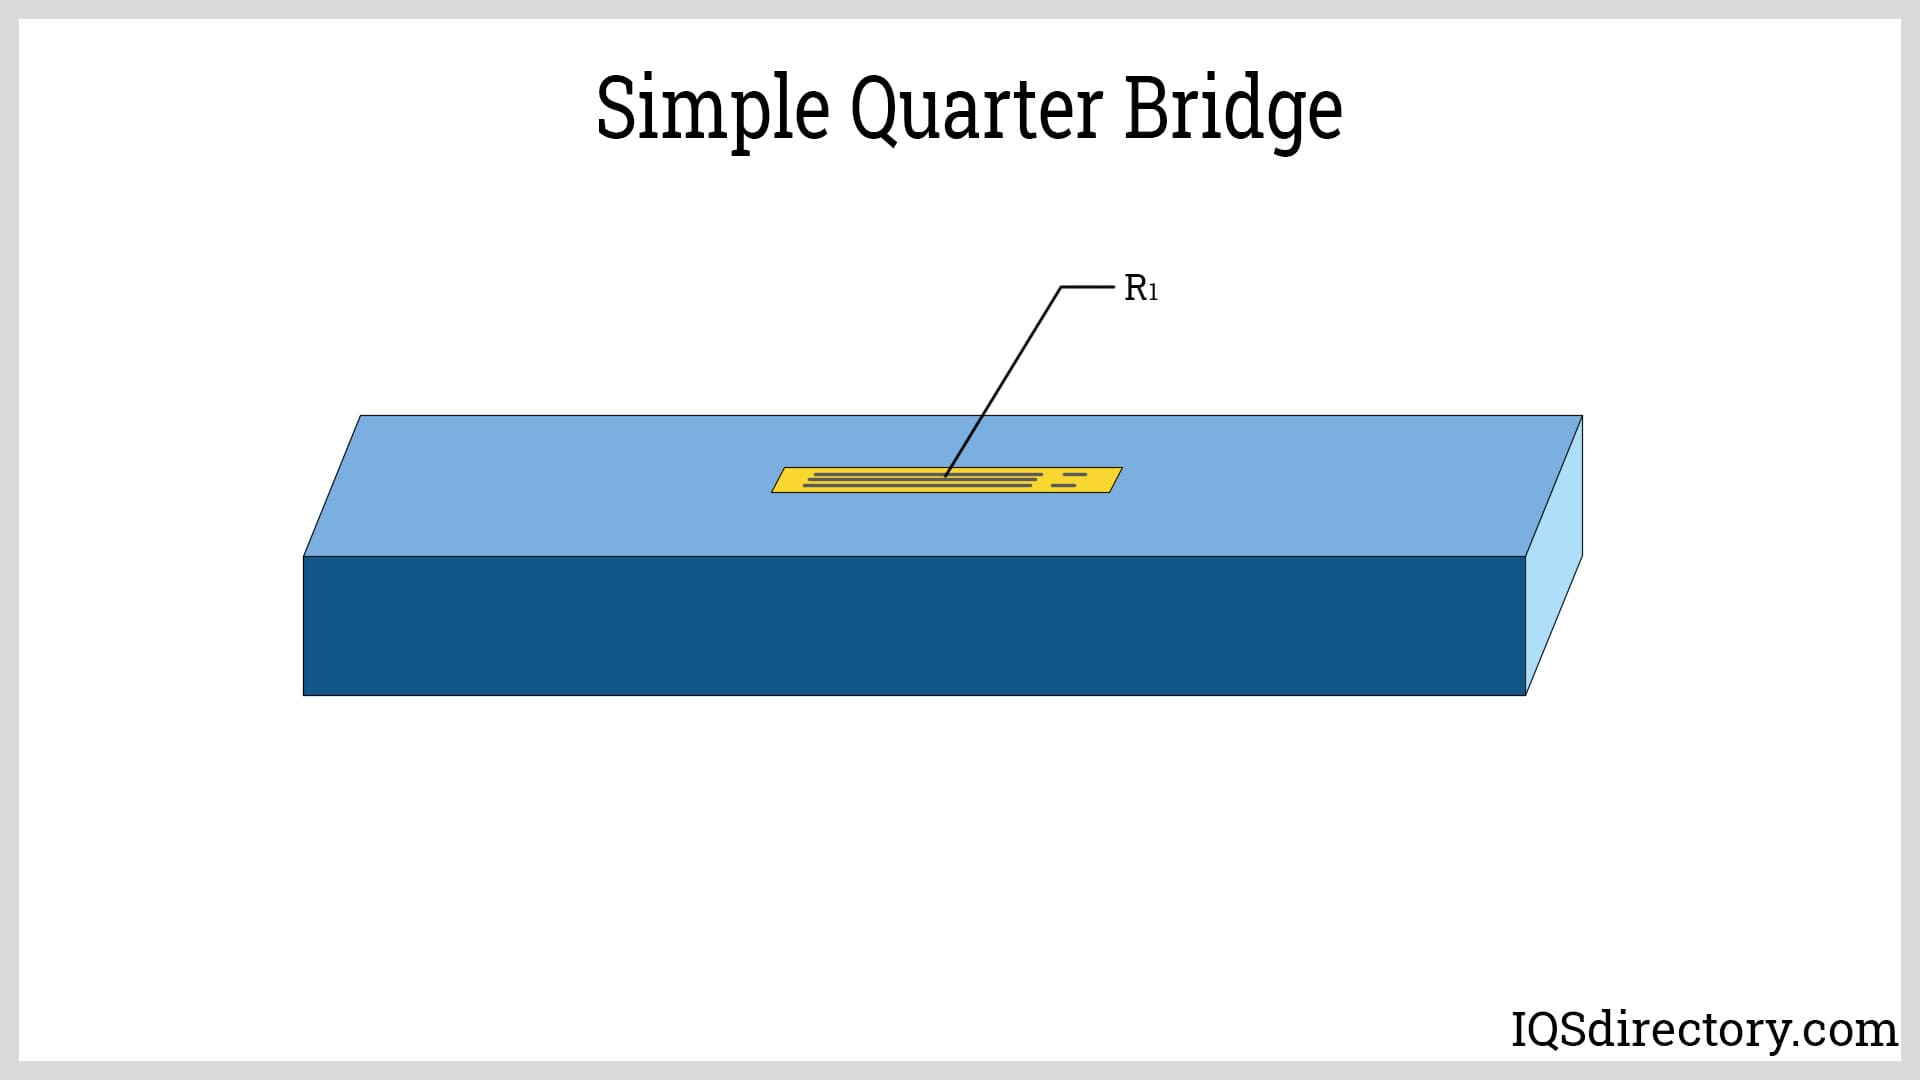
Simple Quarter Bridge: This is the simplest among the strain gauge types in this category. It is composed of one active gauge and three completion resistors. The completion resistor paired with the strain gauge is called a dummy resistor. This type is the least sensitive and is prone to errors caused by temperature variations.
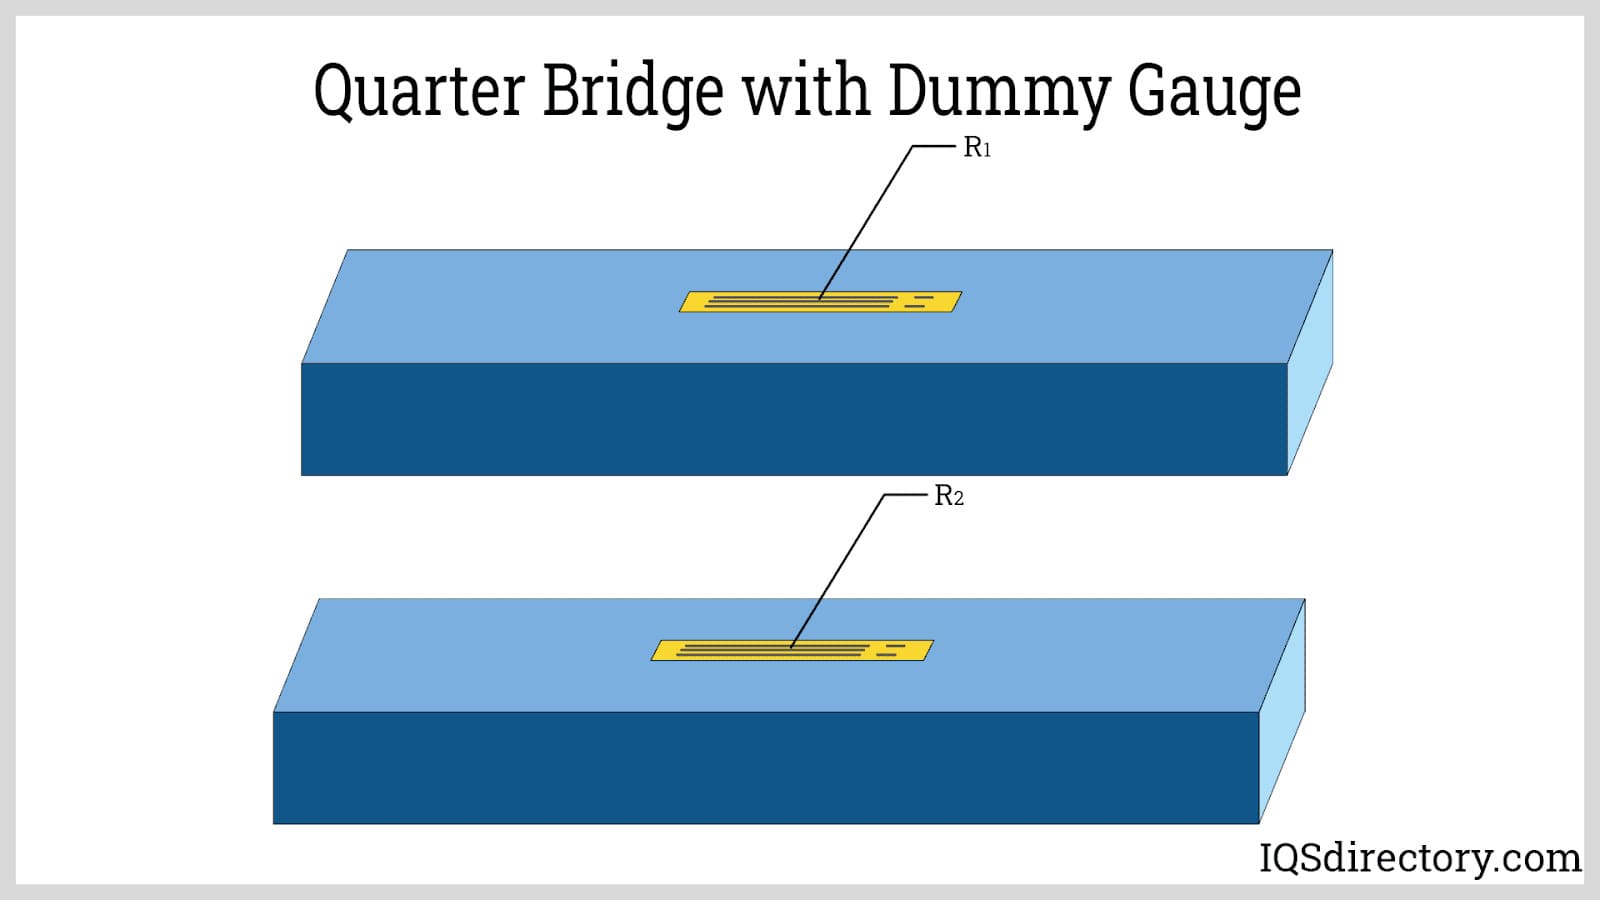
Regarding the temperature variations, the change is felt with the same magnitude by both the active and dummy gauges. Since the active and dummy gauges are in the same leg, the ratio of their resistances does not change. Thus, the effect of temperature is nulled or minimized.
This configuration features two active strain gauges. One strain gauge is placed on one leg of the circuit, while the other is positioned on the second leg. These gauges are mounted on opposite sides of the elastic element or structure, oriented parallel to the direction of the applied load.
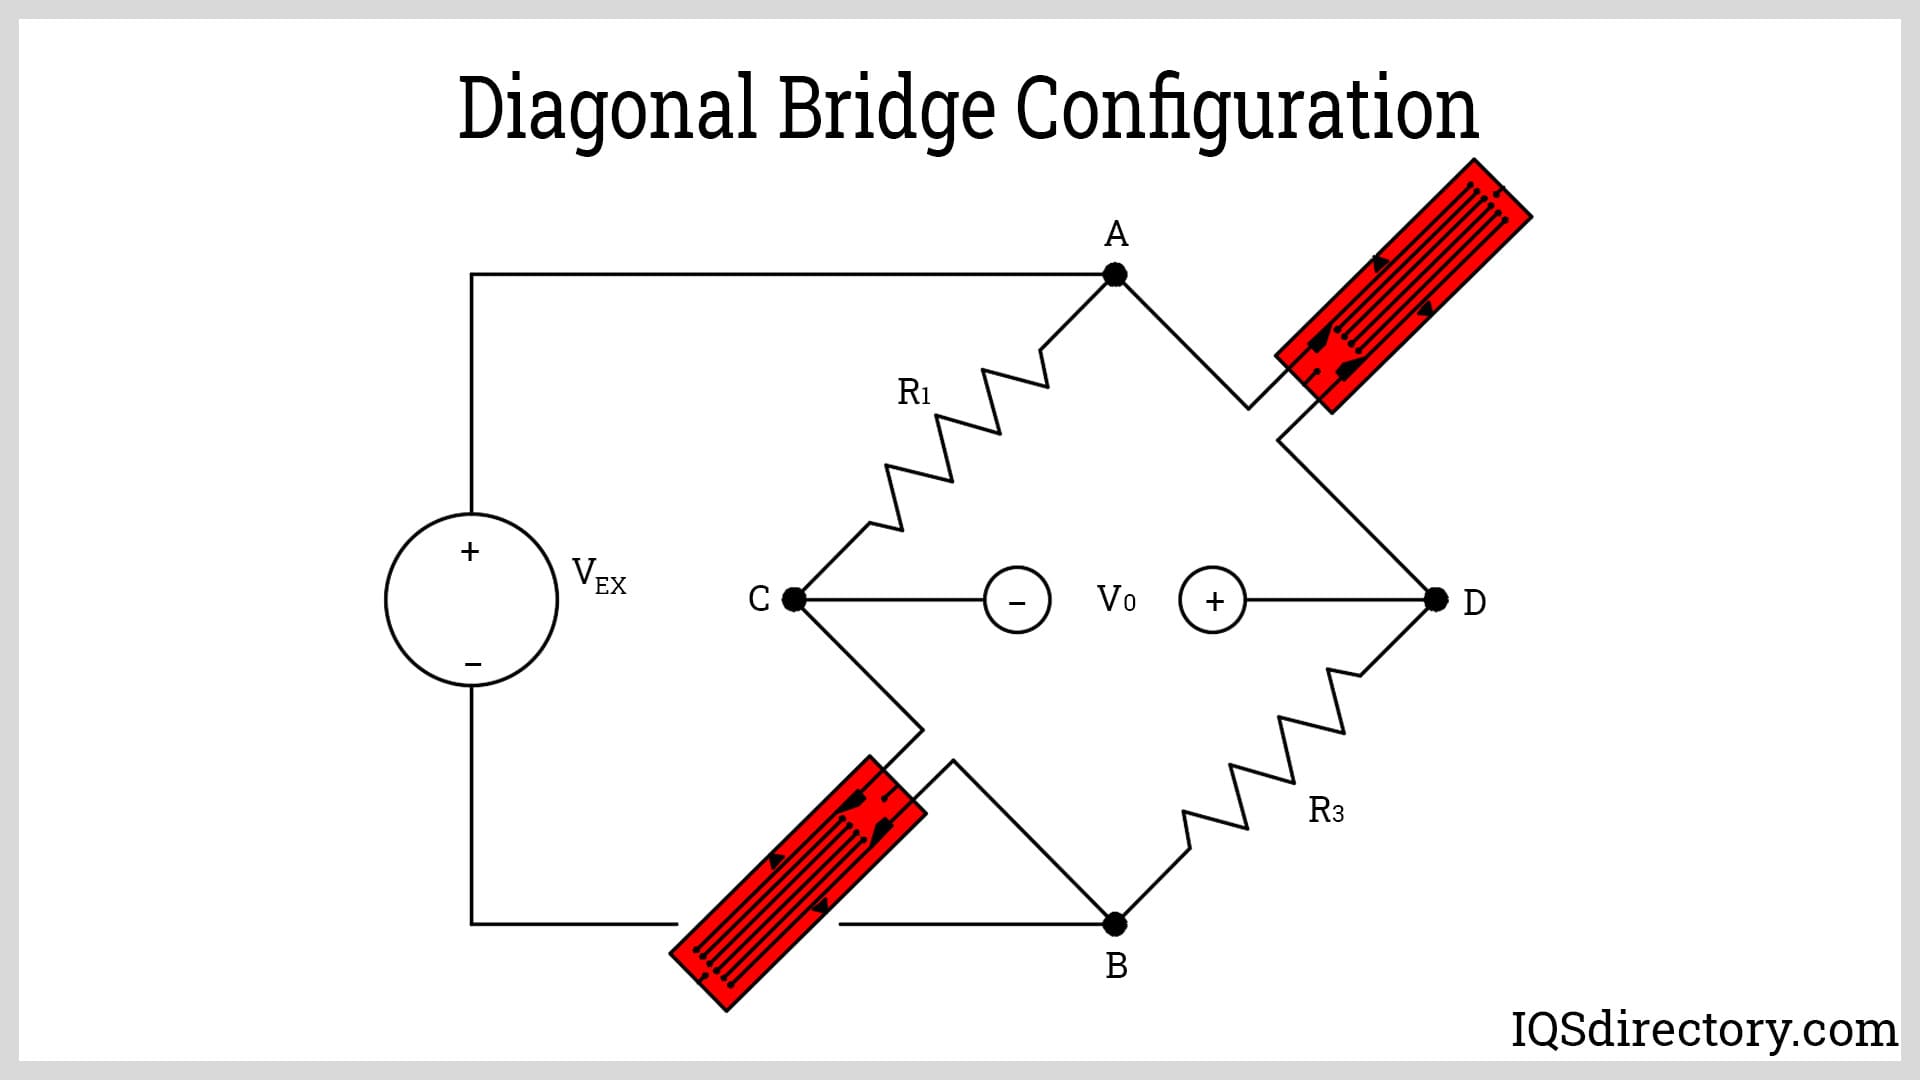
The diagonal bridge design offers two main advantages. Firstly, it provides increased sensitivity. Since both strain gauges in this configuration experience the same deformation, the output signal is roughly twice as large as that of a simple quarter-bridge circuit.
Secondly, it effectively rejects bending strain. Diagonal bridge strain gauges are designed to measure only tensile and compressive strains. If the gauges detect strains in opposite directions, their effects cancel each other out, ensuring accurate measurements as long as the strains are aligned in the same direction.
However, this configuration also has a notable drawback: it is highly sensitive to temperature variations. This sensitivity can double the error introduced by temperature changes. To mitigate this issue, dummy gauges are used in conjunction with each active gauge to compensate for temperature-induced errors.
Half-bridge circuits use two active strain gauges, making them more sensitive than quarter-bridge circuits due to the presence of two strain-measuring elements. There are two possible configurations for the strain gauges in a half-bridge circuit.
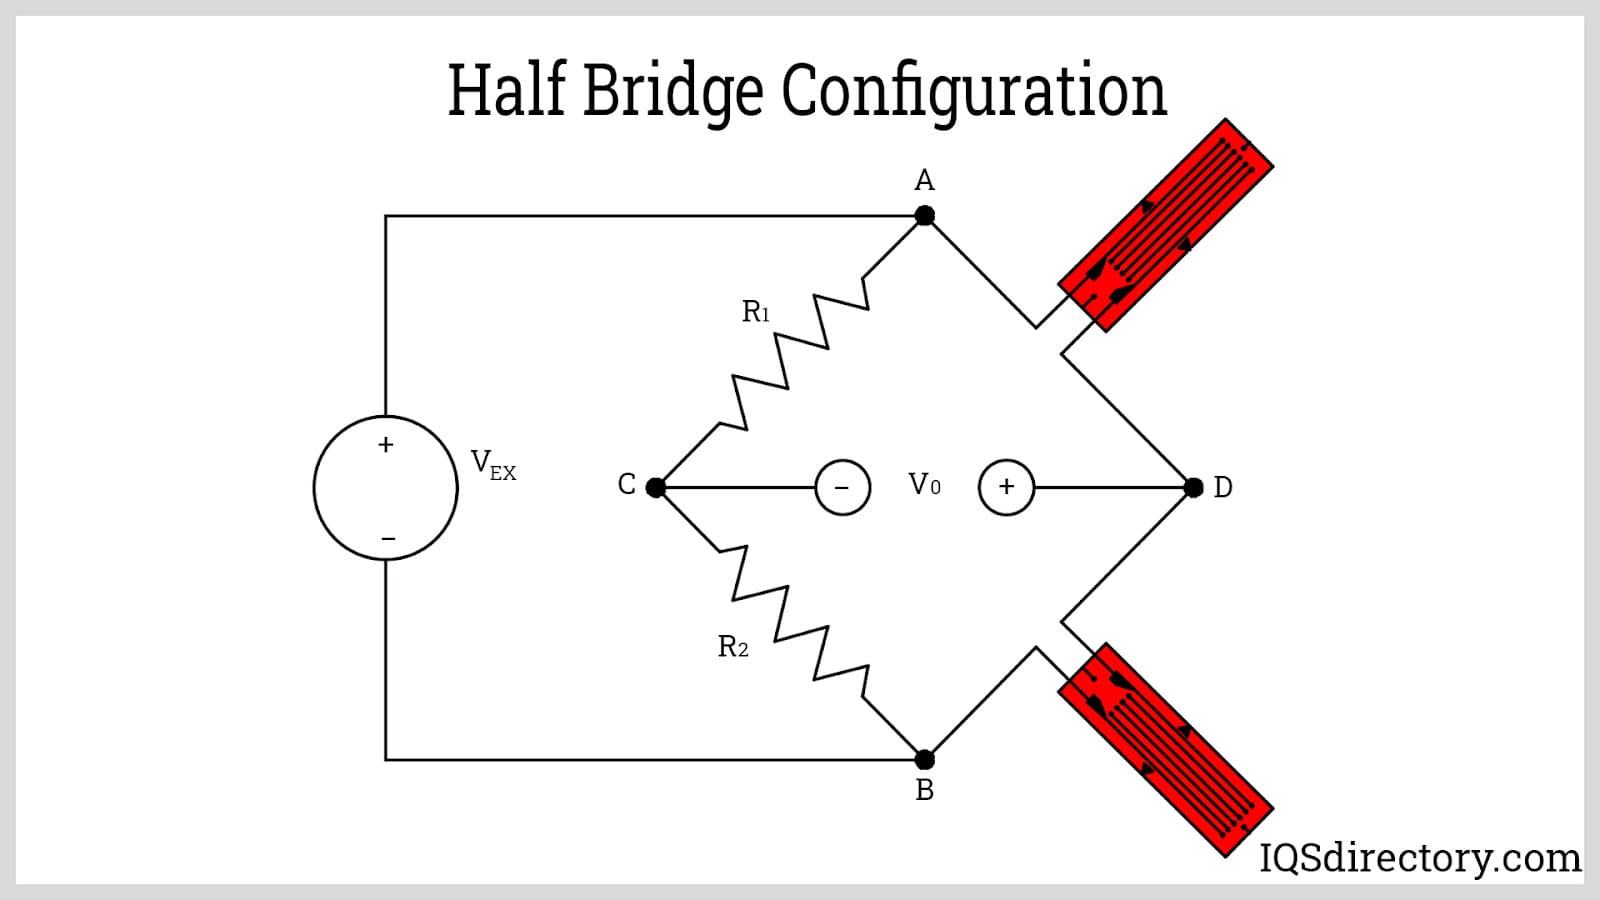
Half Bridge with Poisson Gauge: In this design, one strain gauge is oriented in the longitudinal or axial direction while the other is in transverse. It can measure tensile, compressive, and bending strains with higher sensitivity.
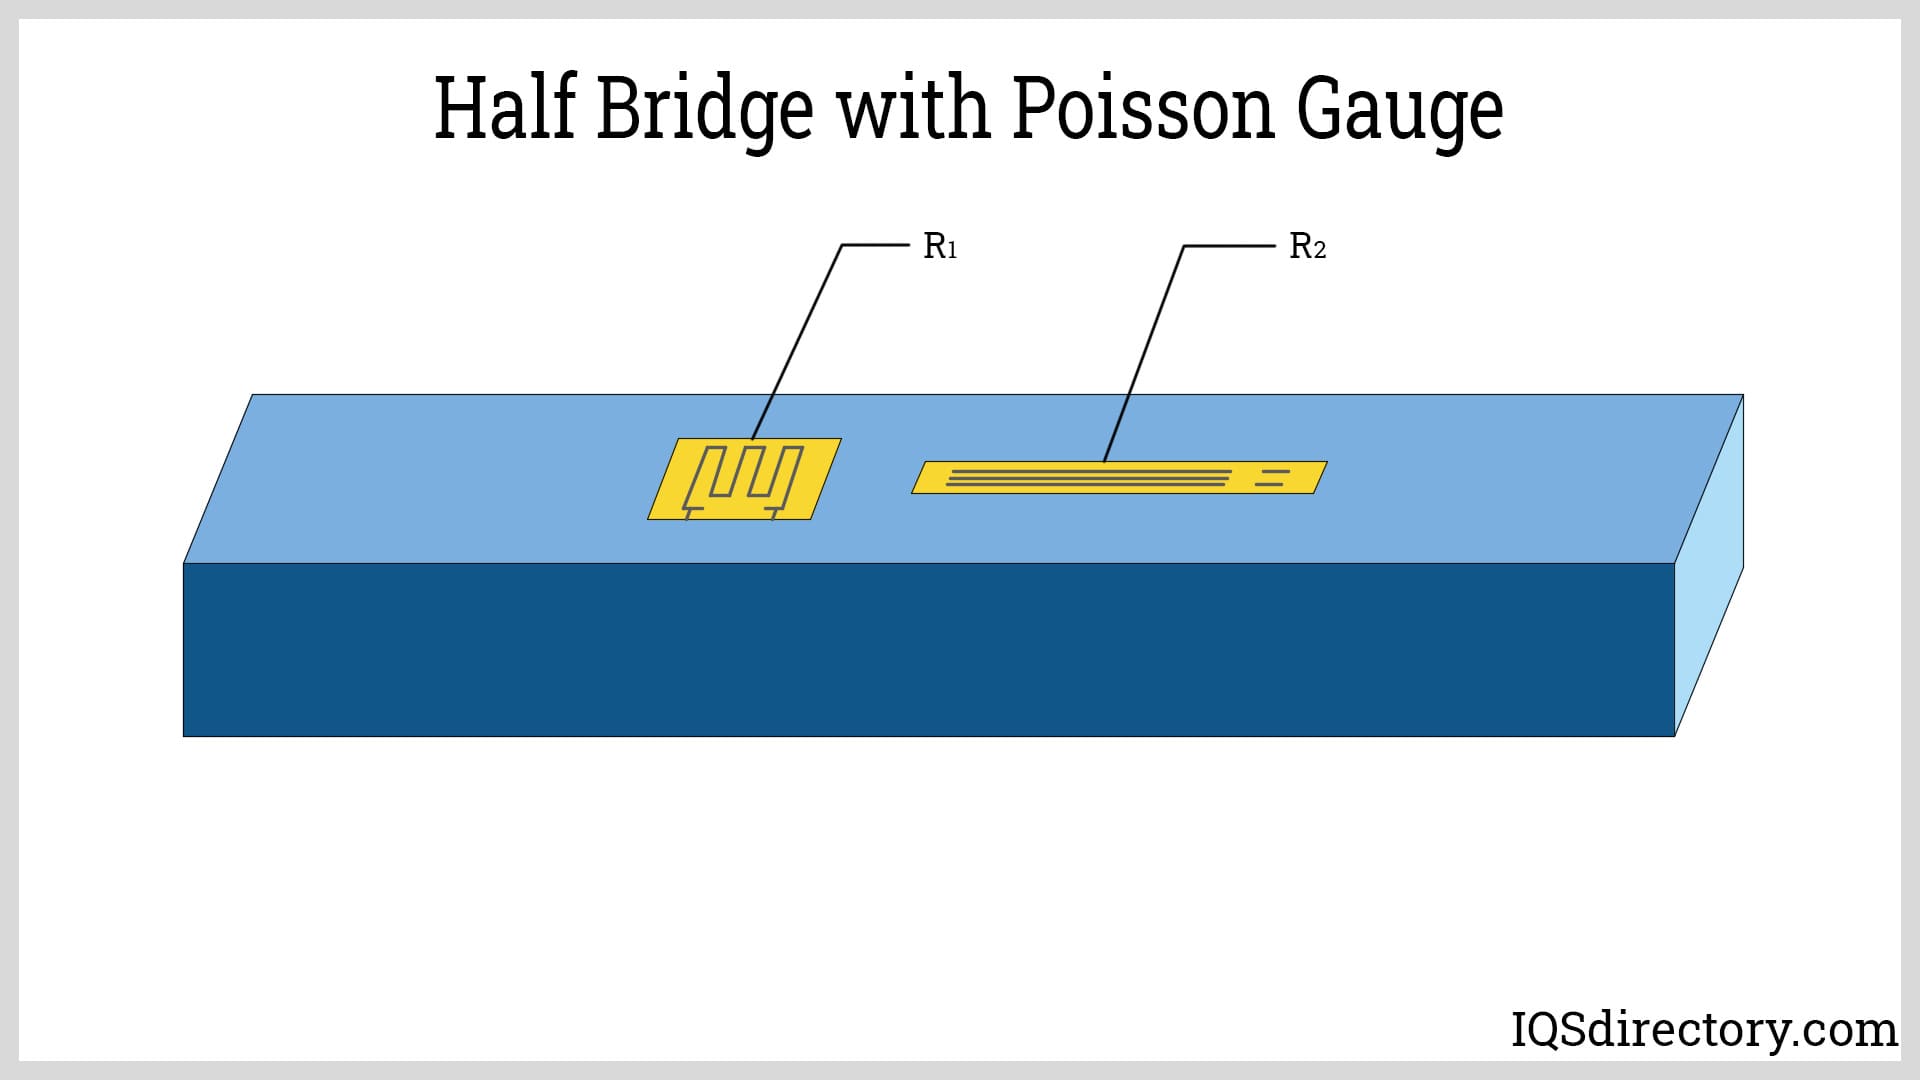
This half bridge configuration operates on the Poisson effect. The Poisson effect is the tendency of a material to change its cross-section in the direction perpendicular to the load. Most materials experience opposite strains in perpendicular directions. Since both strain gauges are used to measure the change in dimension of both axes, the effect on the varying resistances is increased. This, in turn, improves the magnitude of the output voltage. The additional output depends on the Poisson ratio of the material.
Moreover, by having both strain gauges at the same leg of the bridge circuit, they cancel out the effect of temperature. This is similar to the advantage seen in the quarter bridge with a dummy gauge circuit.
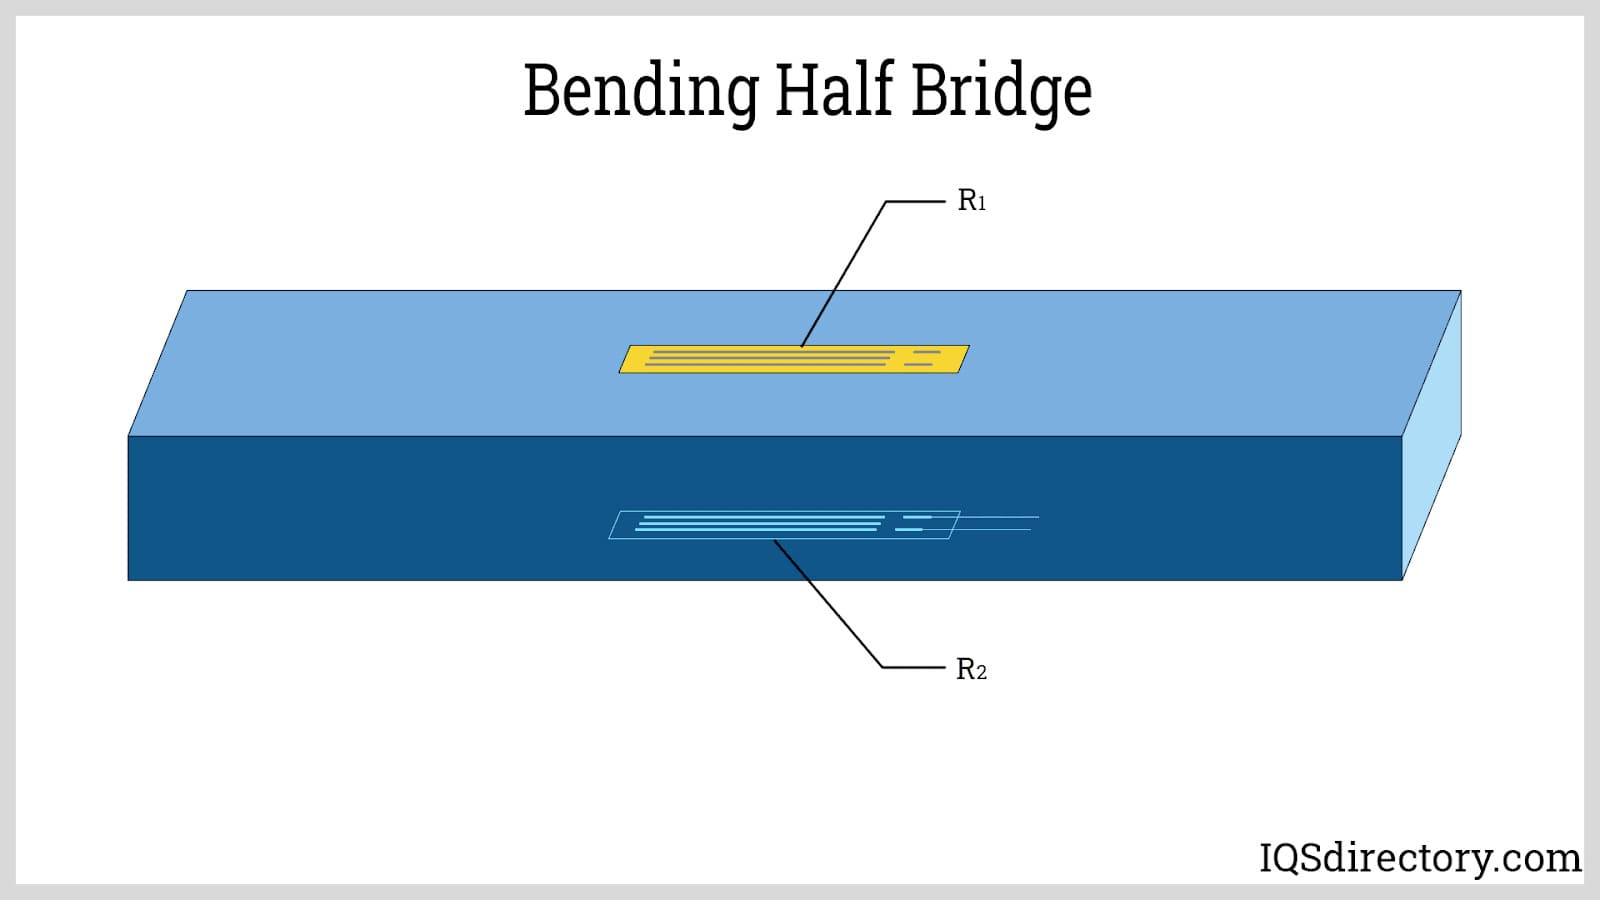
This configuration is specifically designed for measuring bending strain. When an elastic element is bent, the sides perpendicular to the applied force experience either tension or compression. The two strain gauges in this setup measure the resulting deflection of the elastic element.
A notable feature of this design is its ability to eliminate the effects of axial strain. The transducer processes the voltage readings so that one strain gauge experiences tension while the other experiences compression. This arrangement ensures that any resistance change in one gauge due to tension is counterbalanced by the change in the other gauge, effectively negating axial strain. Additionally, this configuration also helps to cancel out temperature-induced errors.
A full-bridge circuit utilizes four active strain gauges in place of all resistors, offering high versatility due to the multiple configurations possible. Since all resistances are variable, temperature effects are effectively canceled out across the entire circuit, regardless of the specific configuration used. Below are the different subtypes of full-bridge circuits.
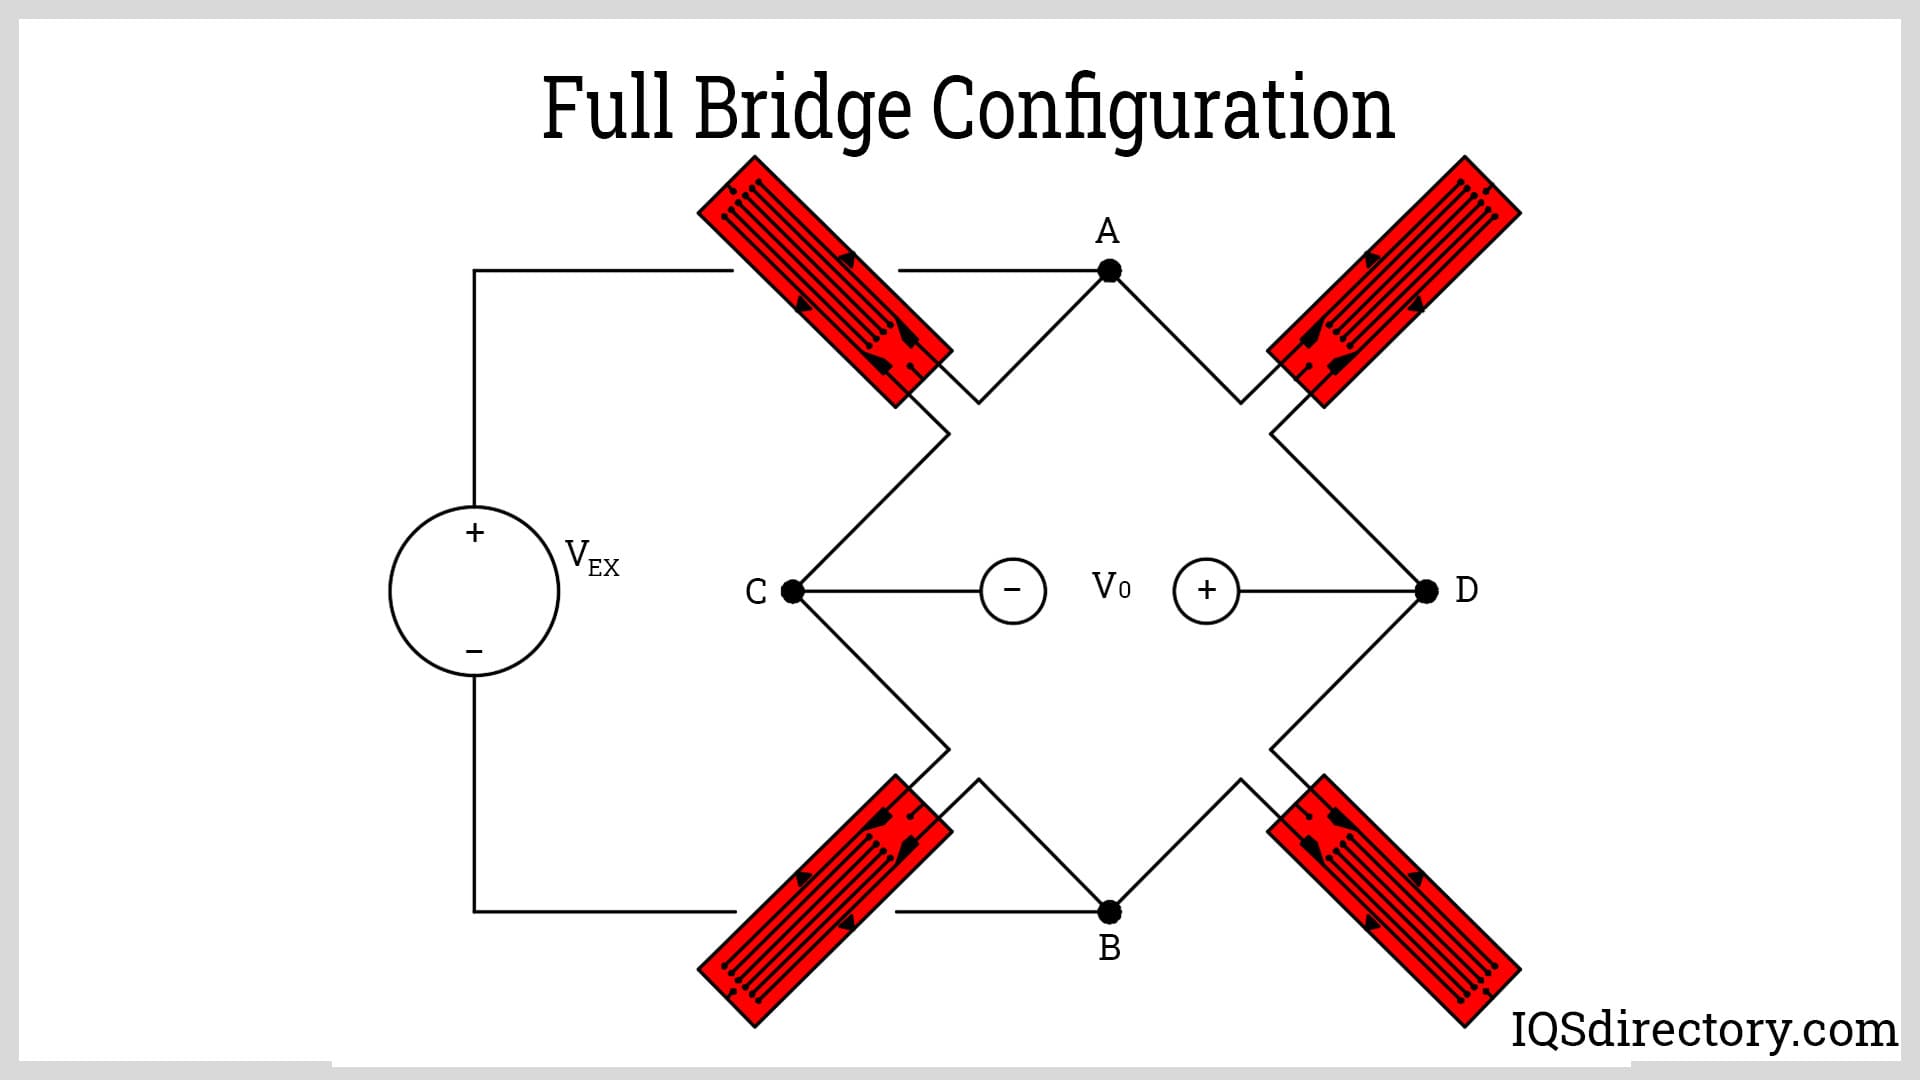
Axial and Bending Full Bridge: In this configuration, all four strain gauges are mounted on one side of the structure. As much as possible, the gauges are coplanar with each other. The gauge pairs on one leg of the bridge are oriented such that one is perpendicular to the other.
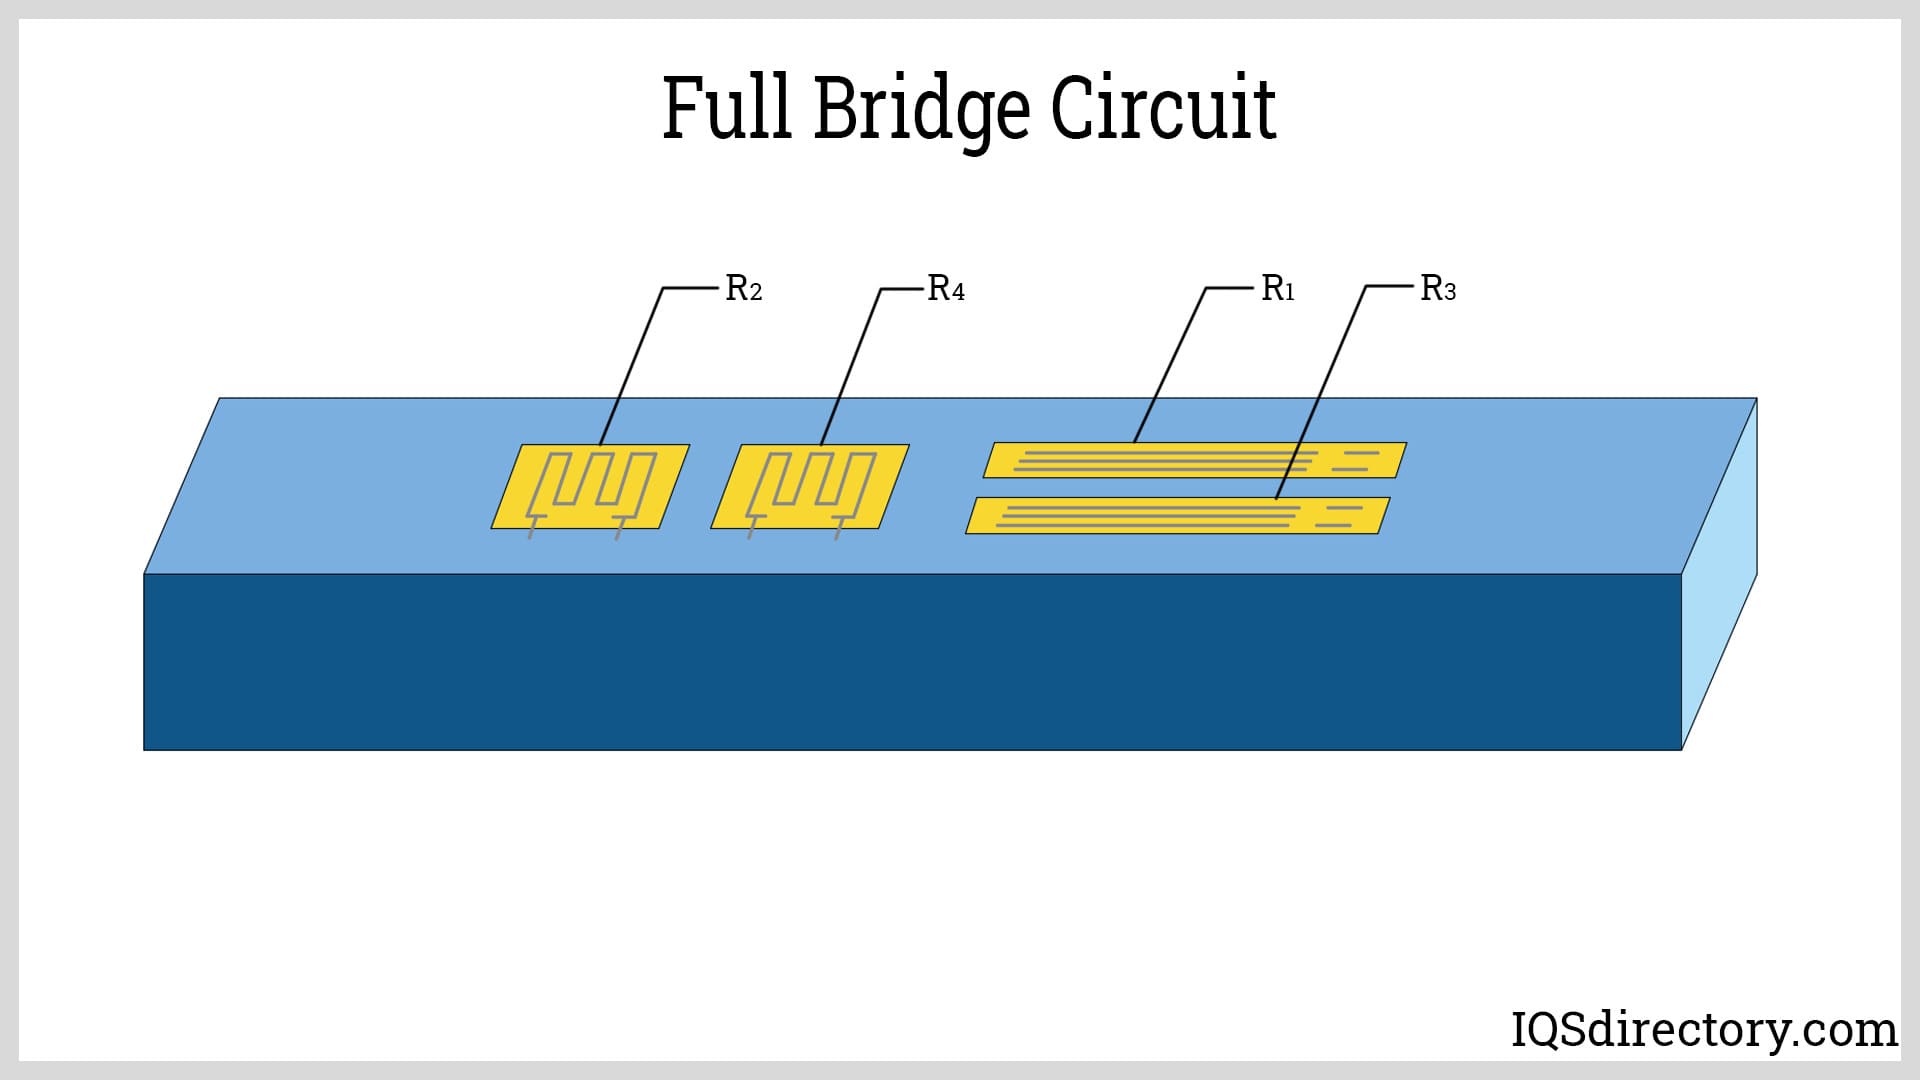
An axial and bending full bridge circuit is regarded as two Poisson half bridge circuits working in tandem. The result is an output signal with twice the magnitude of its half bridge counterpart.
Axial Full Bridge: In this design, two strain gauges are mounted on one side of the structure while the other two are mounted on the opposite side. The coplanar gauges are aligned perpendicularly with their pair.
Similar to the previous type, this configuration works like two Poisson half bridge circuits. This results in an extremely sensitive sensor.

Axial full bridge circuits eliminate bending strain readings similar to that to diagonal bridge circuits. The strain gauges on opposite sides of the structure are assumed to have the same strain direction. When these strain gauges are inversely directed strains, the effect on the resistance ratio is nulled.
Bending Full Bridge: This circuit is created by placing the strain gauge pairs on the opposite sides of the structure and parallel with each other. The arrangement may seem similar to that of the axial type. However, both Poisson gauges are placed on one leg of the circuit.
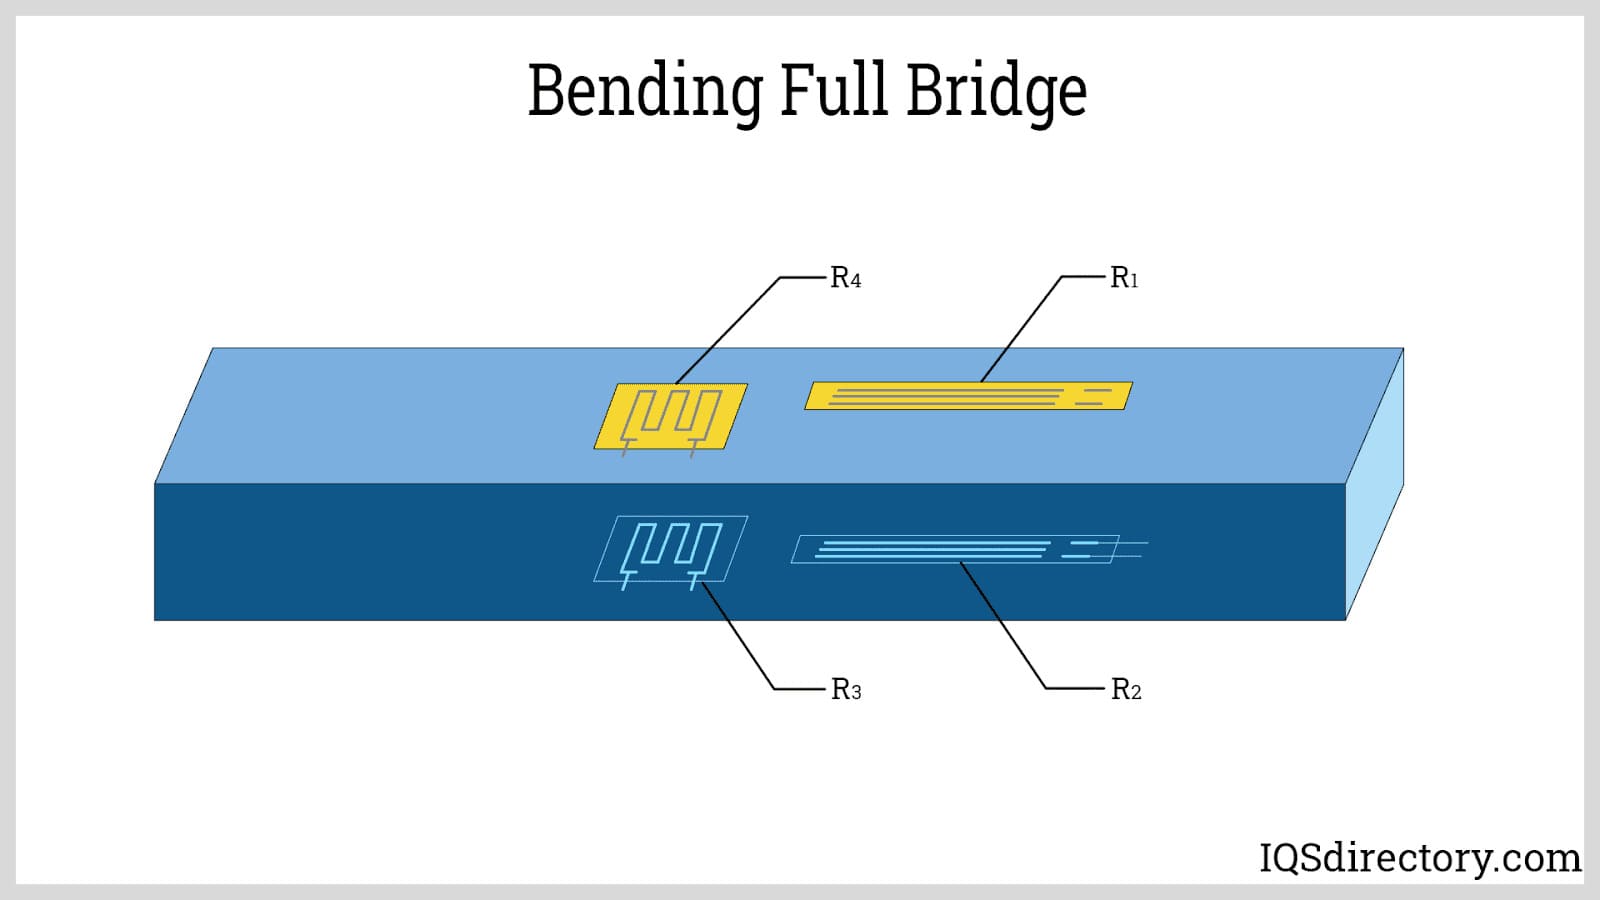
This version of the bending full bridge circuit combines the characteristics of the Poisson half bridge and bending half bridge circuits. Not only is the axial strain eliminated, but the signal sensitivity is increased. The output signal produced is twice that of a Poisson half bridge.
Bending Full Bridge without Poisson Gauge: This bending full bridge circuit has all four strain gauges aligned in one direction. Thus, this type does not have a Poisson gauge. Strain gauge pairs are placed on opposing sides of the structure.
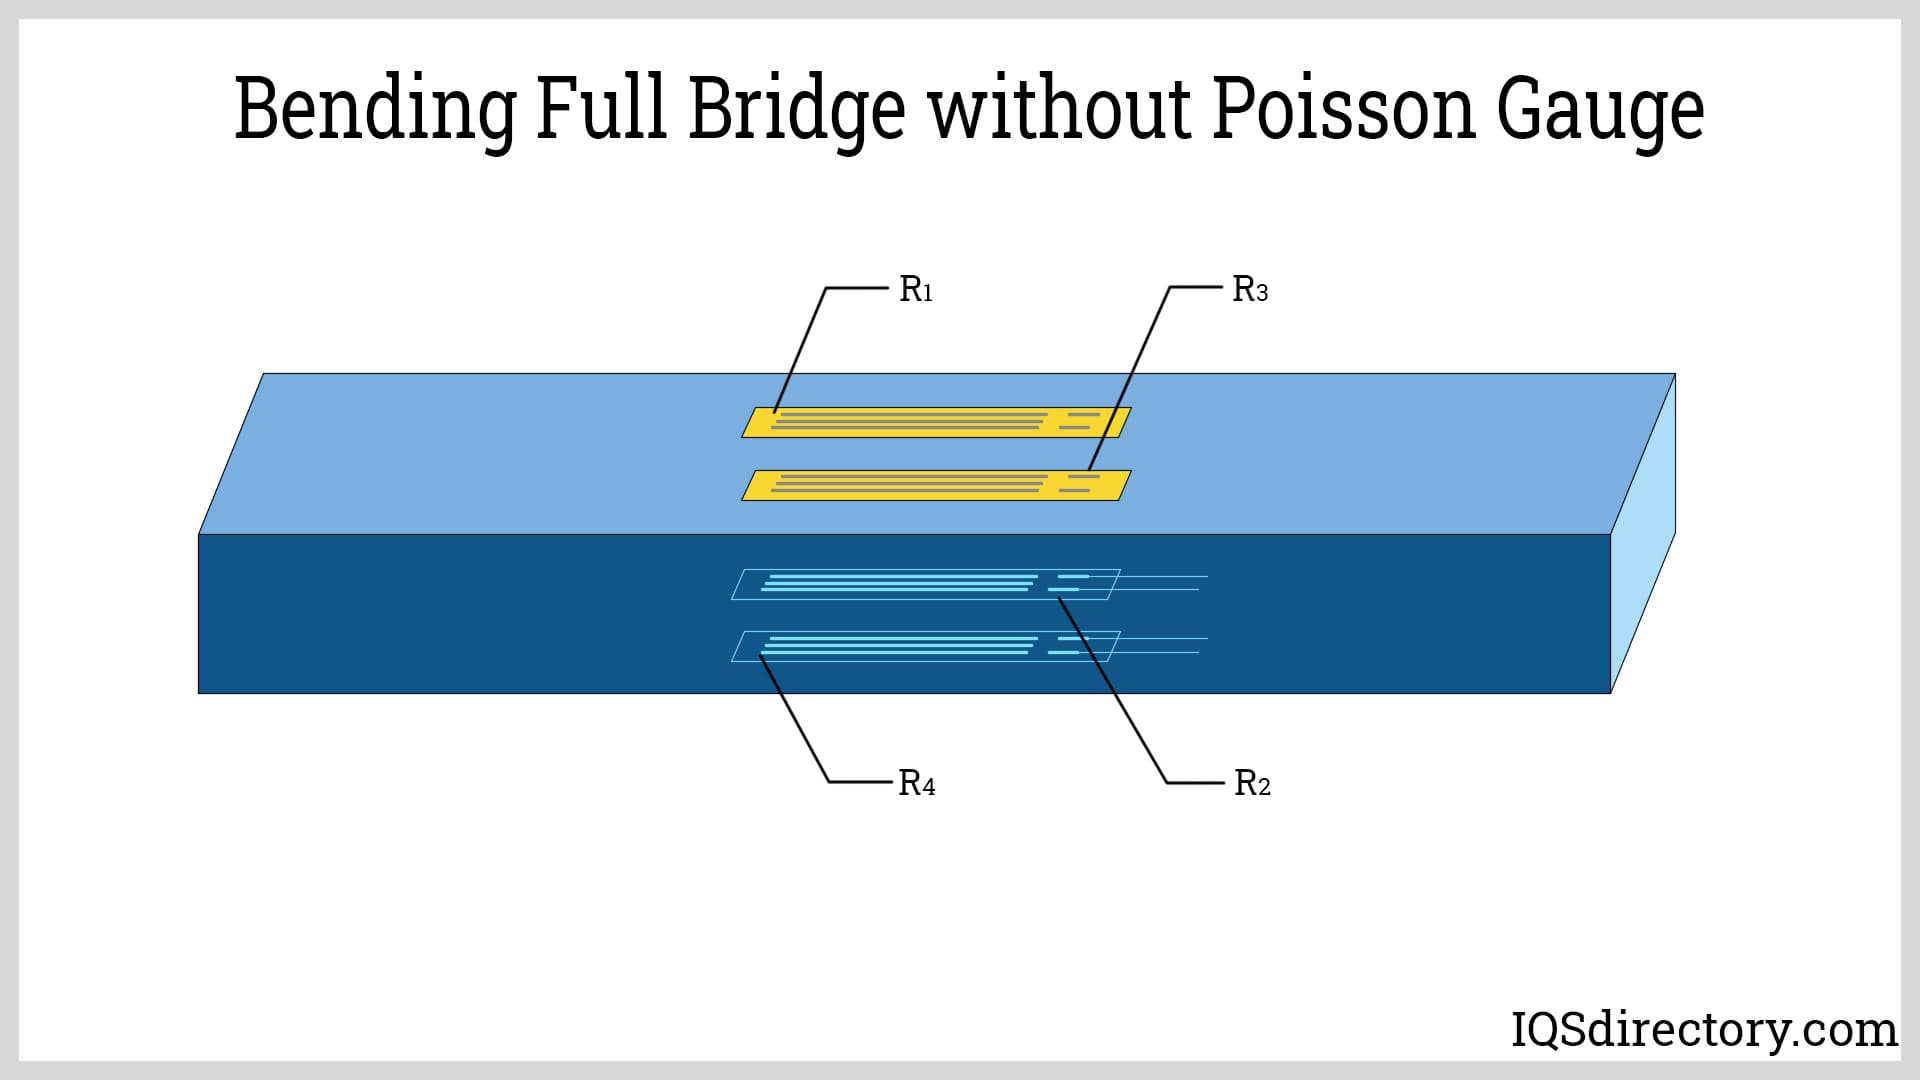
This configuration operates similarly to two bending half-bridge circuits. The strain gauge pairs on one leg of the circuit experience tension and compression, effectively eliminating the effects of axial strain when deflection is detected in a single direction.
With four strain-measuring conductors, this setup offers quadruple the sensitivity of a simple quarter-bridge circuit.
Understanding the various bridge configurations helps in comprehending the different types of strain gauges. Strain gauges are generally named based on their arrangement of measuring elements. Depending on the specific application, a single strain gauge type can be used in multiple bridge configurations.
Linear strain gauges measure strain along a single direction. They are characterized by their simple construction and low cost, making them ideal for general applications such as load testing, fatigue testing, and structural integrity monitoring. Linear strain gauges can be used in quarter-bridge, diagonal bridge, or axial full-bridge circuits.
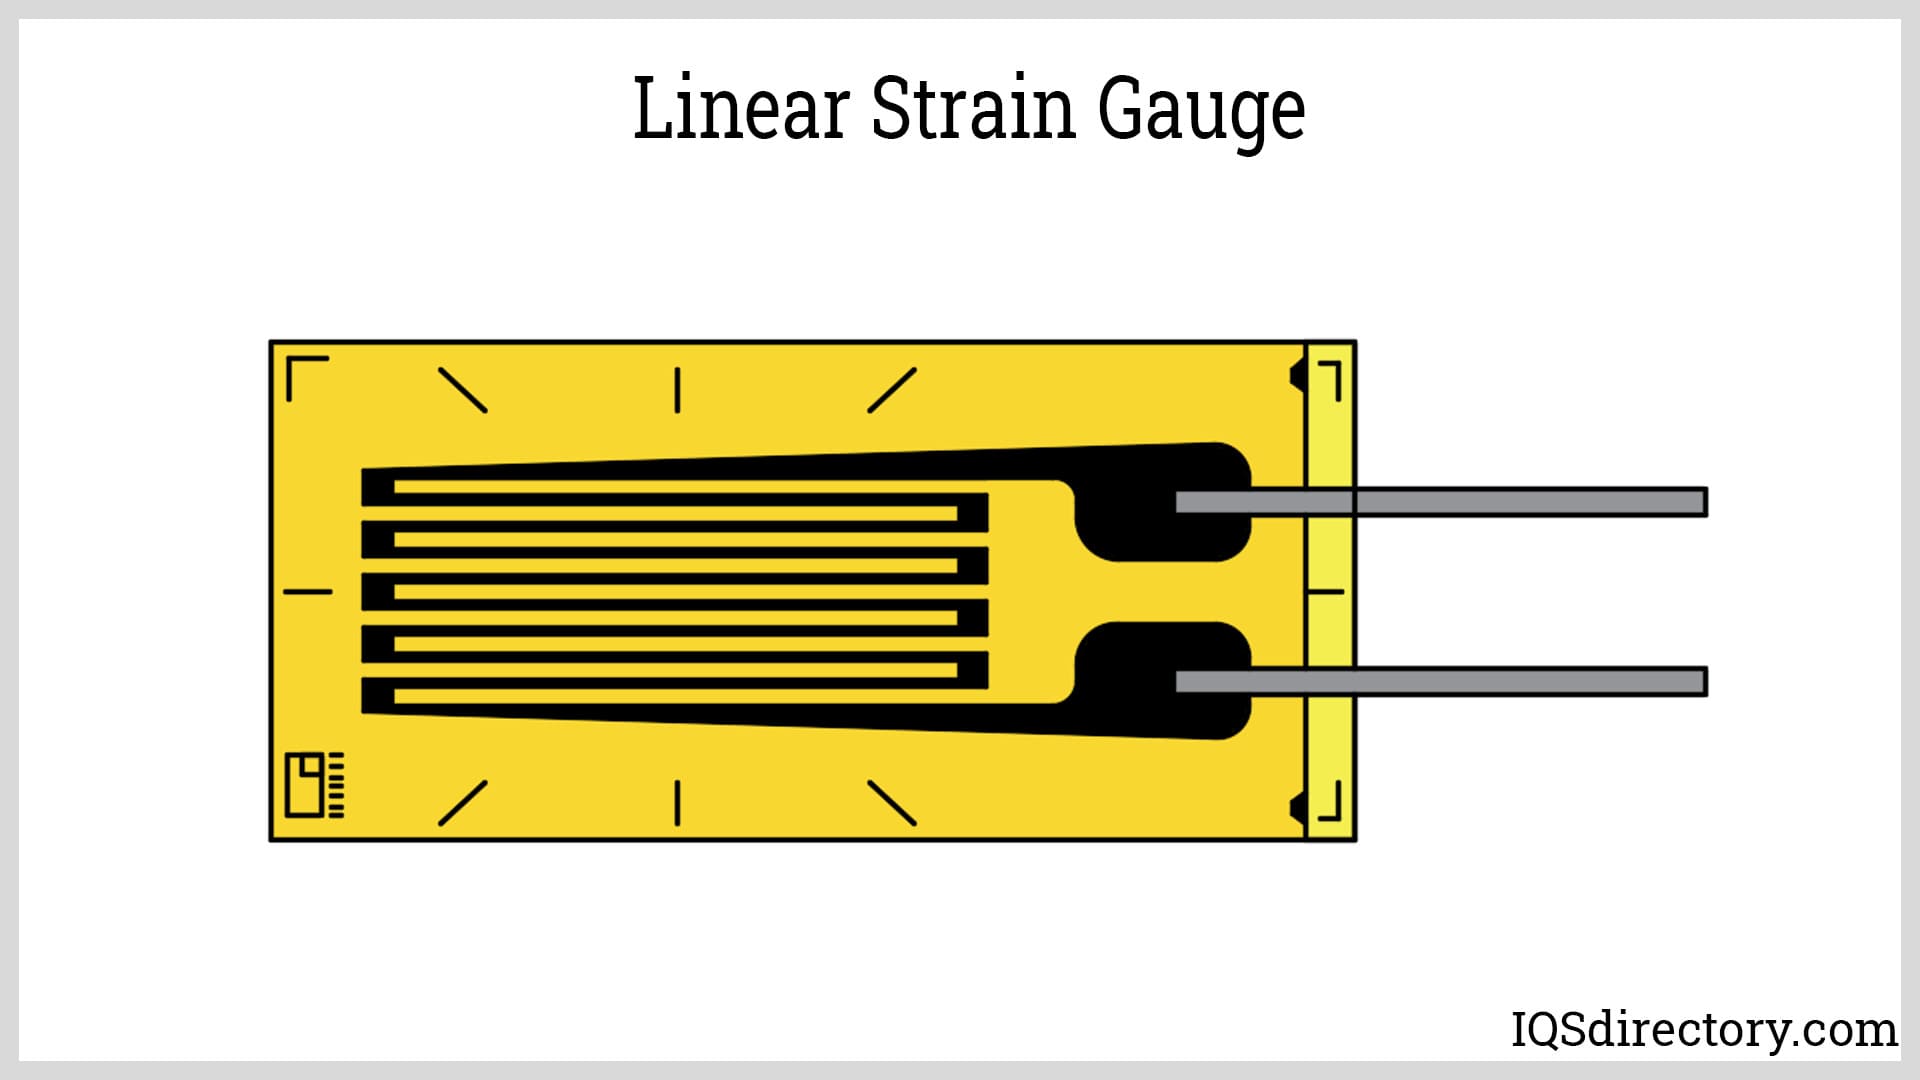
Rosette strain gauges are made from multiple measuring elements bonded to a common carrier. As the name suggests, the arrangement of strain gauges resembles a rosette or circular pattern. They are oriented to have different measuring axes to measure strains generated by biaxial stress conditions.
There are various types of rosette strain gauges, with the basic examples briefly described below.
Tee Rosette Strain Gauges: Sometimes referred to as 90° rosettes, these strain gauges are composed of two measuring elements oriented perpendicularly with each other. They are used in applications where the principal strain directions are known. One measuring element is aligned with the direction of a strain.
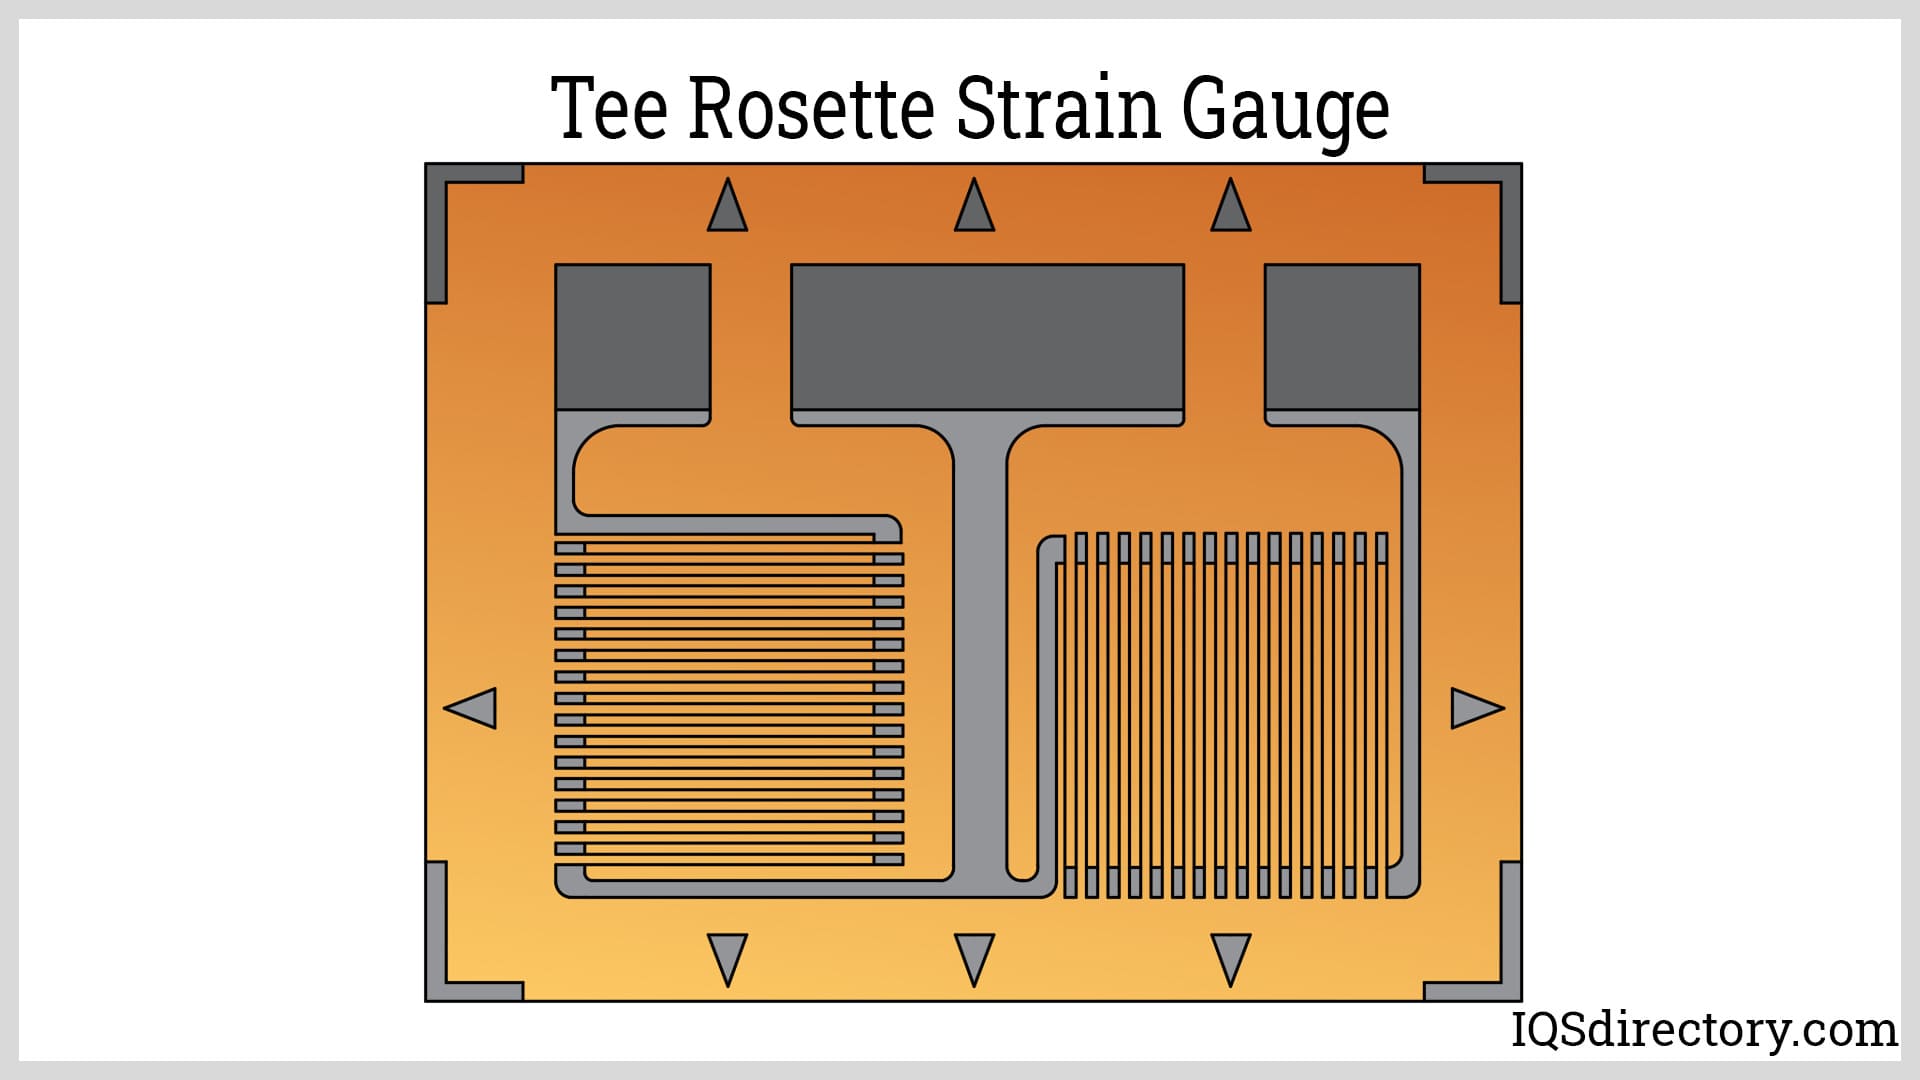
90° Rosette strain gauges can be configured into half bridge circuits. Full bridge circuits can also be created by using multiple rosettes.
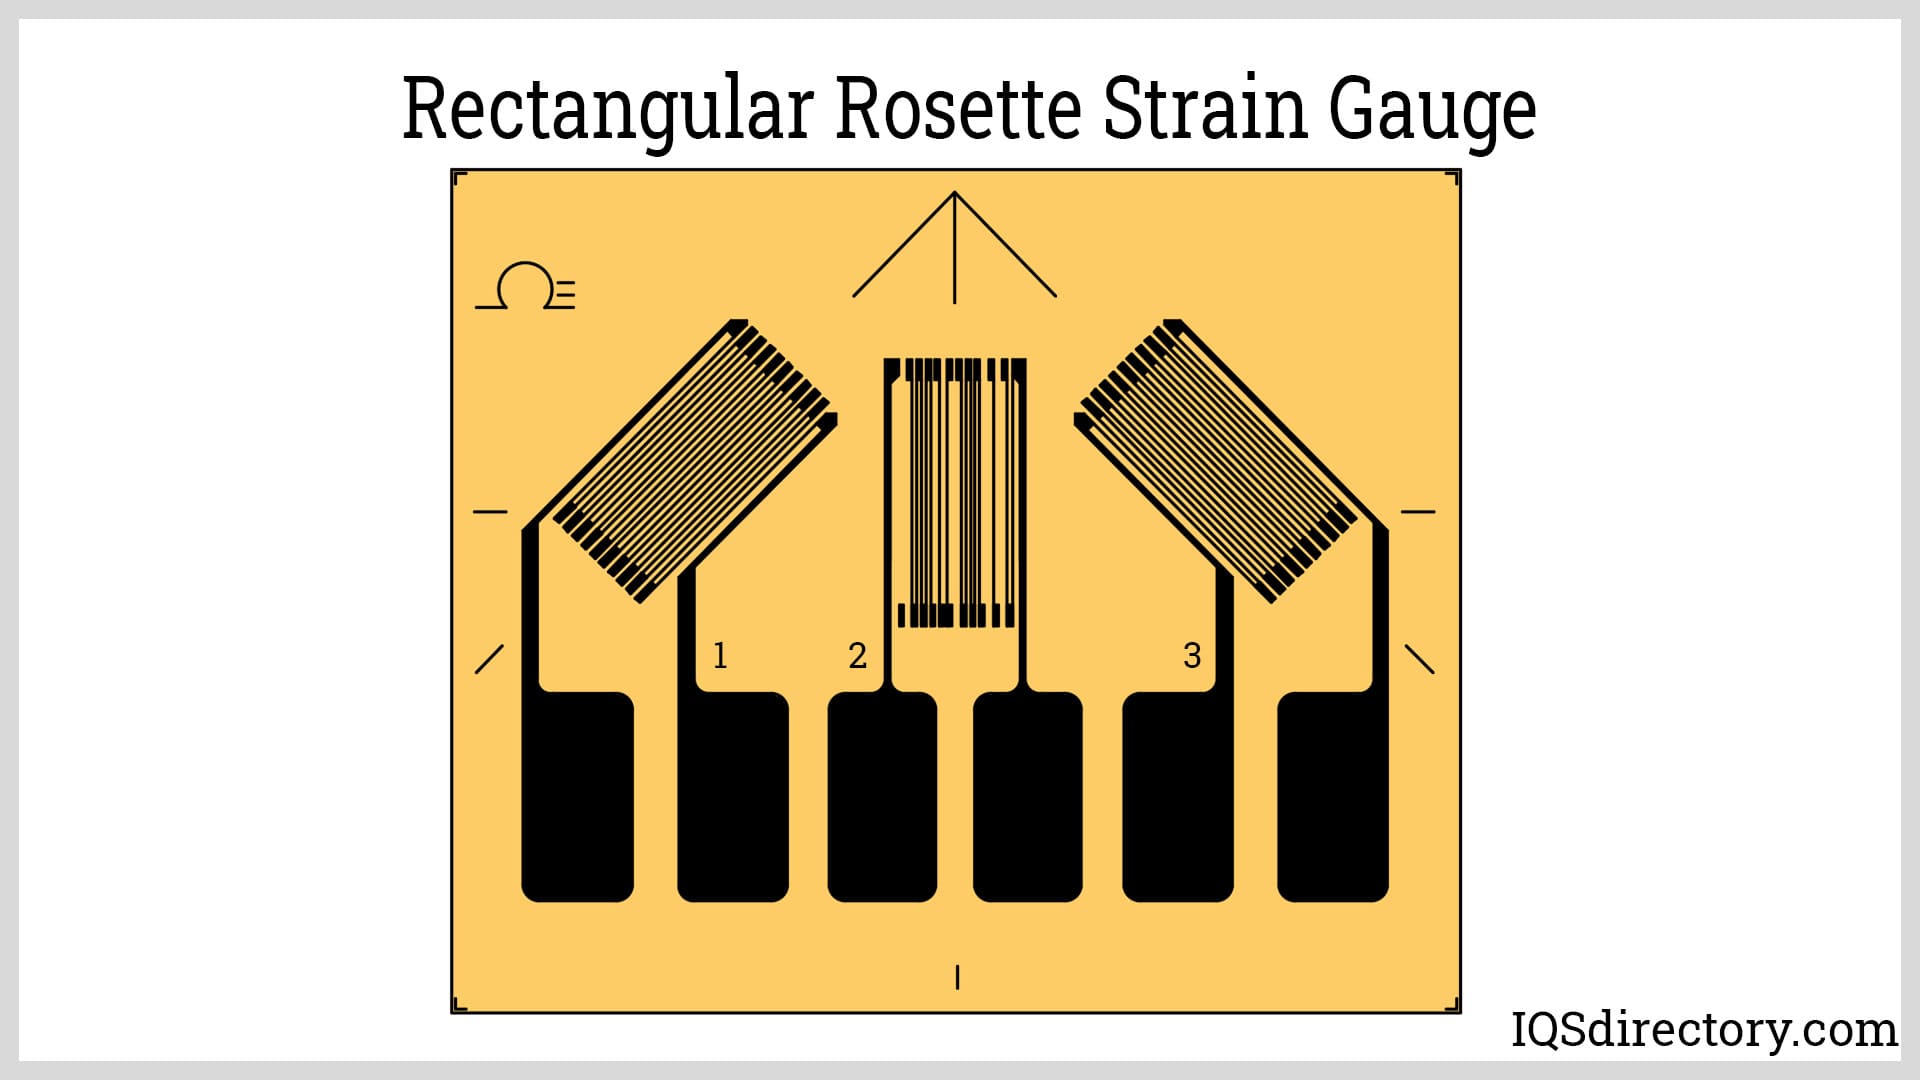
Rectangular Rosette Strain Gauges: These rosette strain gauges have three measuring elements crossed at 0°/45°/90°. They are used when the principal strain directions are unknown.
Delta Rosette Strain Gauges: Like rectangular strain gauges, they are also used when the principal strain directions are unknown. The measuring elements are aligned at 0°/60°/120°.
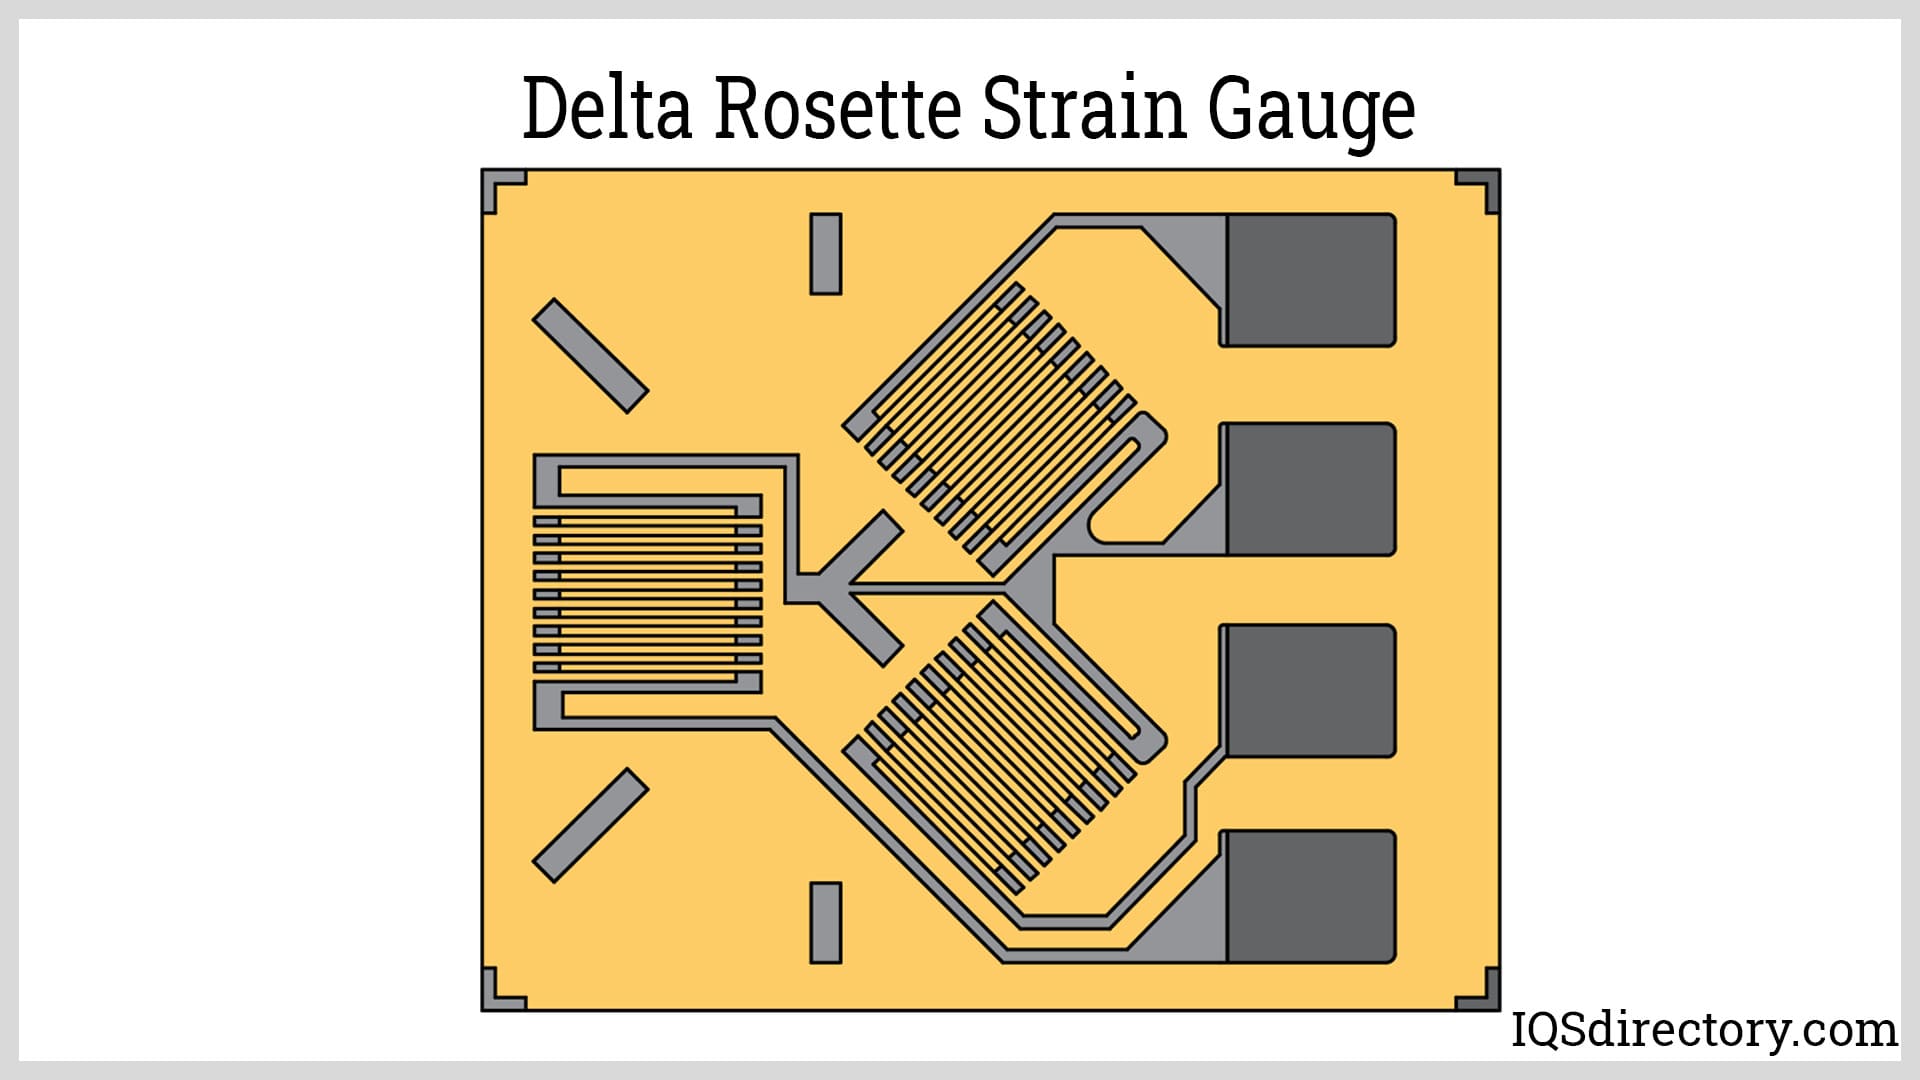
Rectangular and delta rosettes differ in configuration from other strain gauges. The data from their measuring elements are often fed into computer programs for simulation and data analysis. These rosettes are particularly well-suited for stress analysis and dynamic load monitoring.
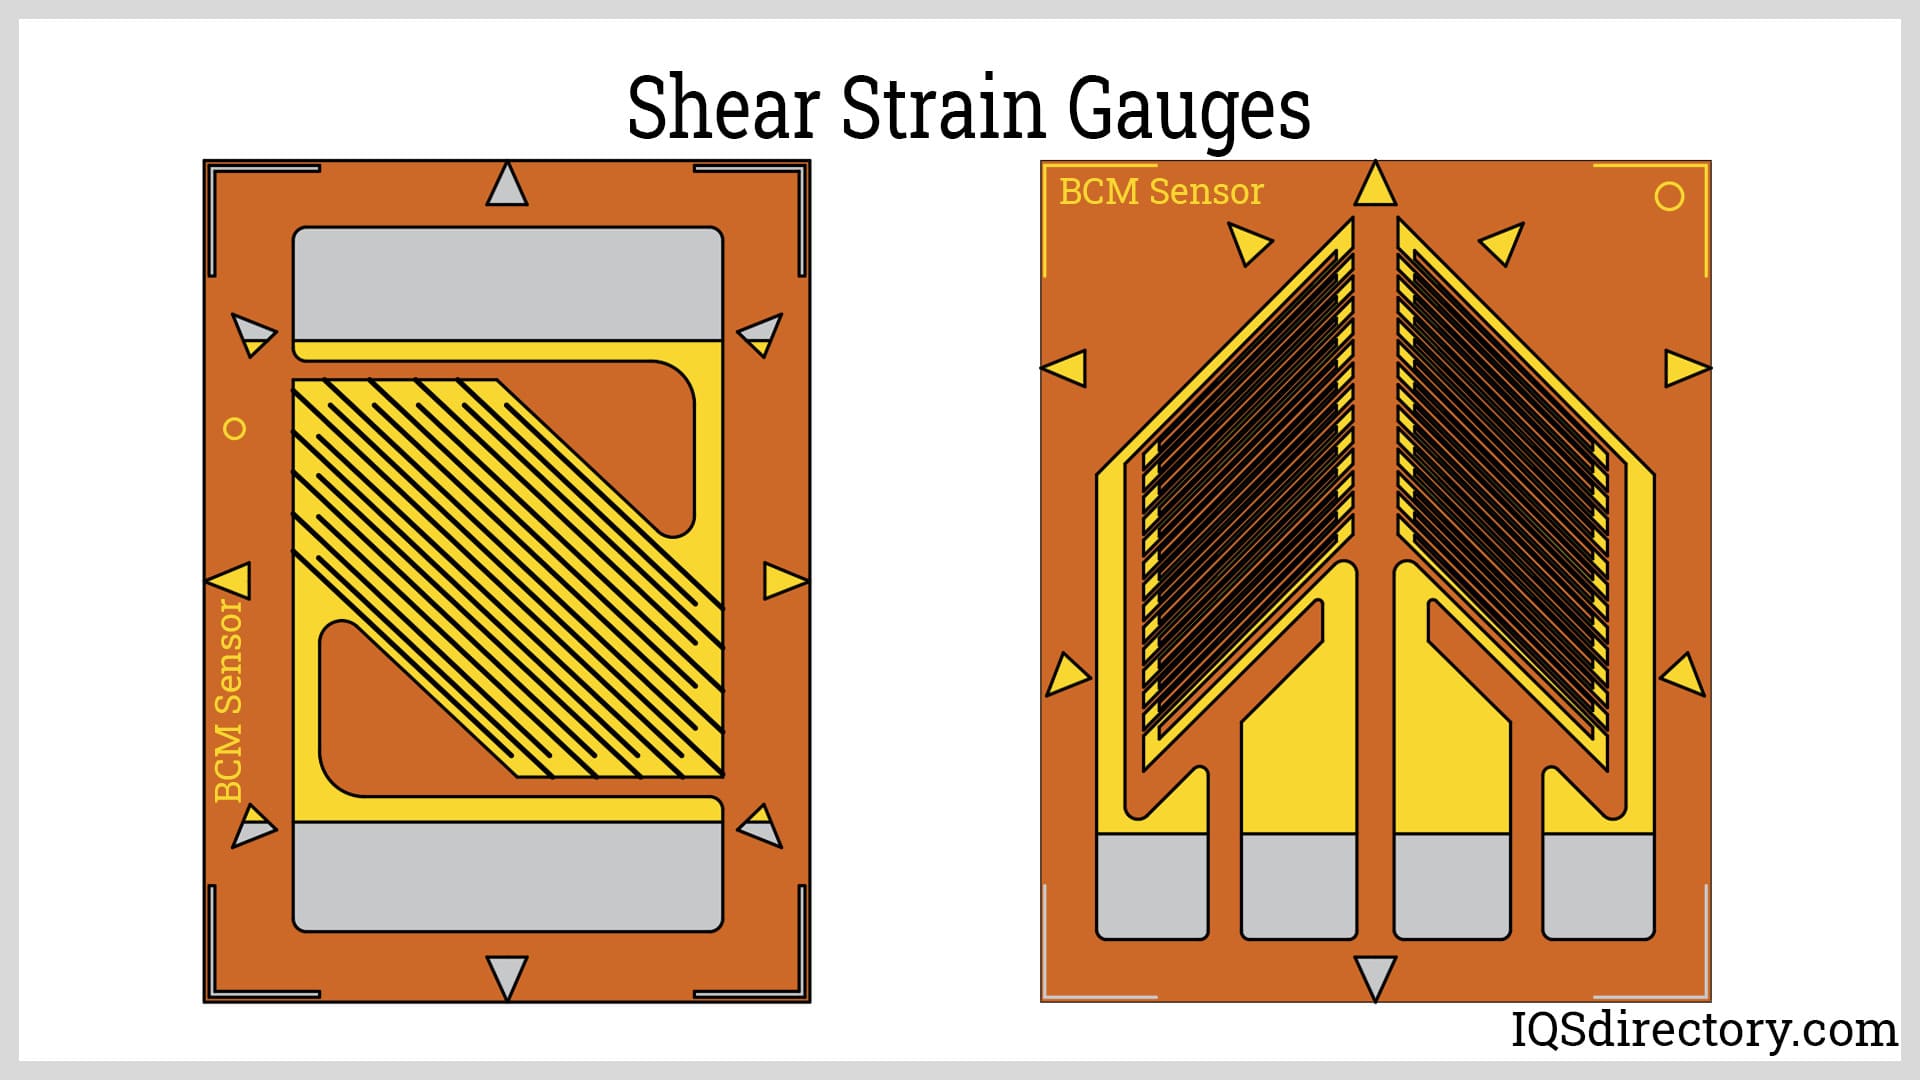
Shear strain gauges are designed to measure shear strain resulting from torque or torsional loading. They can feature either one or two measuring grids attached to a single carrier. In a single-grid configuration, the strain gauge element is oriented at a 45° angle relative to the shaft axis. A two-grid shear strain gauge, also known as a V Rosette, has measuring elements set at 45° and 135°. These gauges are commonly used in applications such as engine shafts and drivetrains, where they can be used to calculate shaft power based on strain measurements.
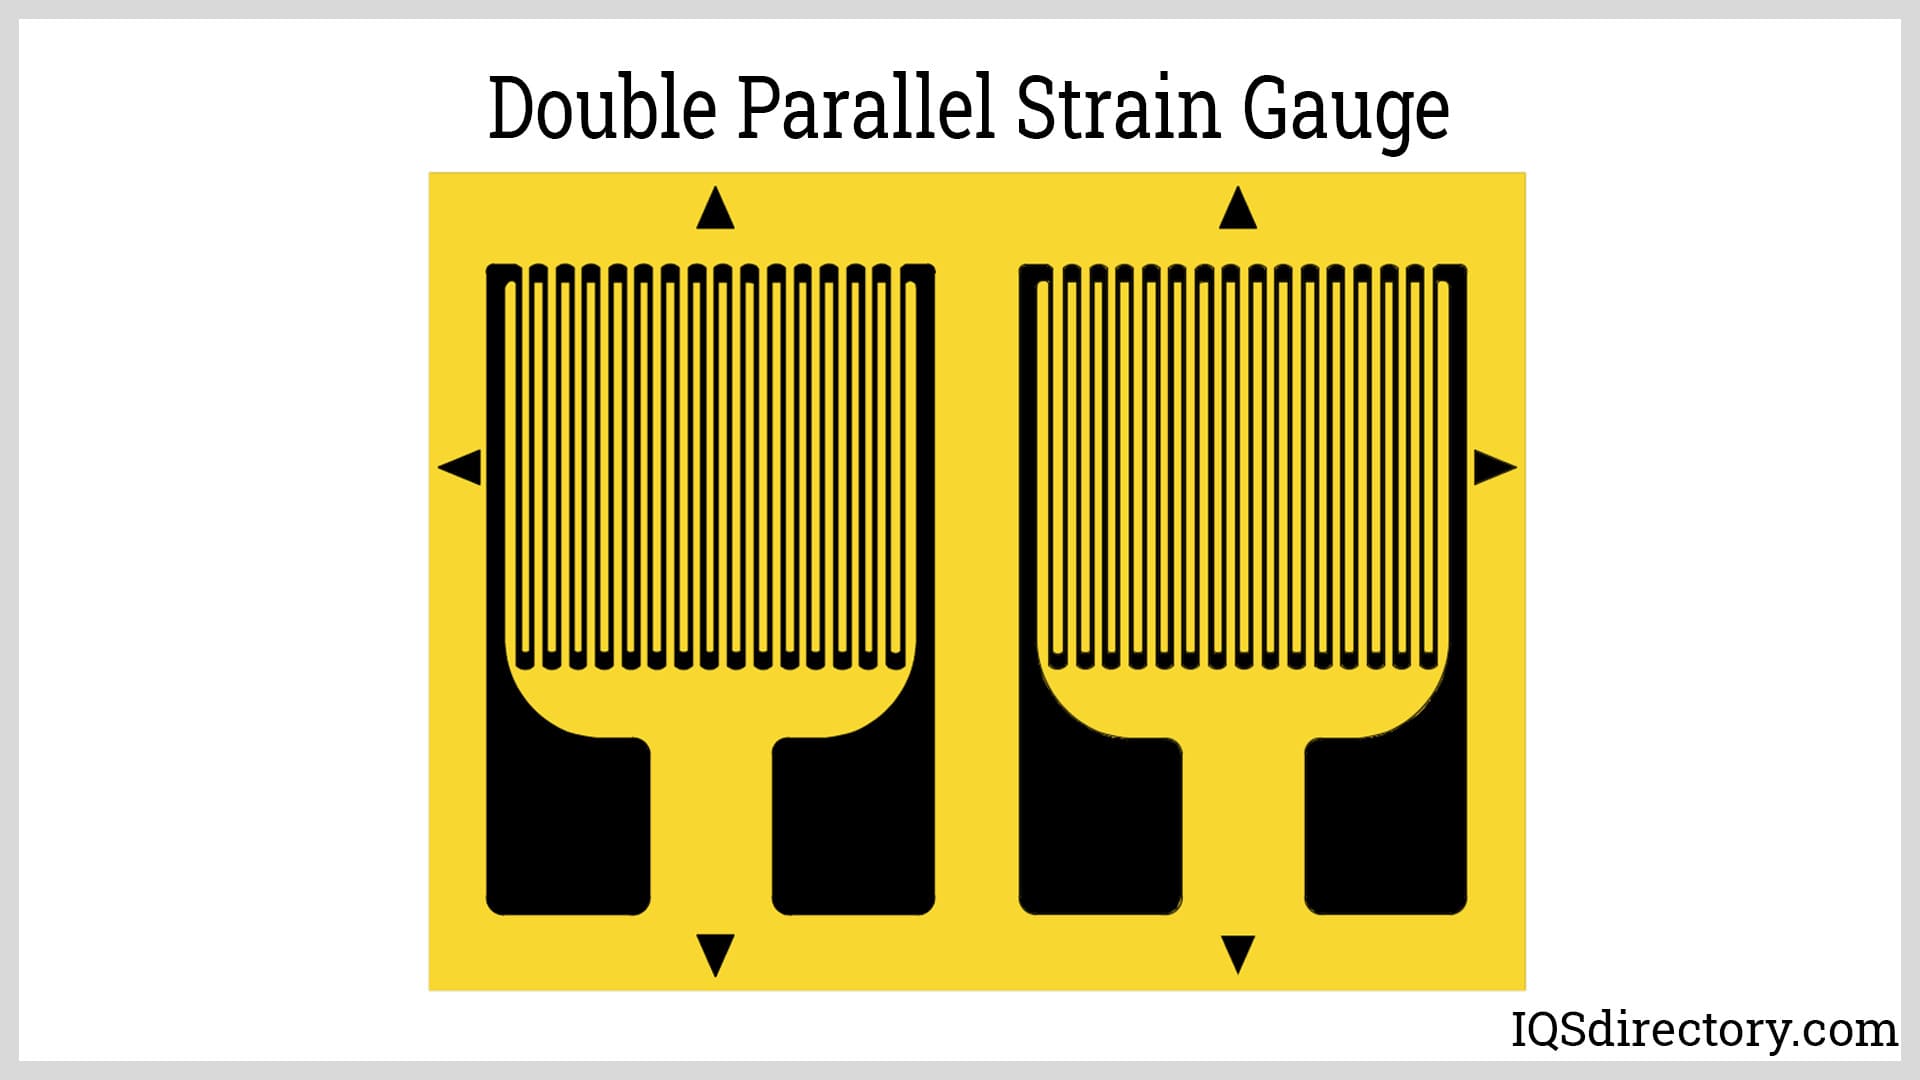
This type consists of two linear strain gauges arranged in parallel. They can be utilized with various bridge circuit configurations. A common example is the bending full-bridge circuit, where two parallel strain gauges are positioned on opposite sides of the structure.
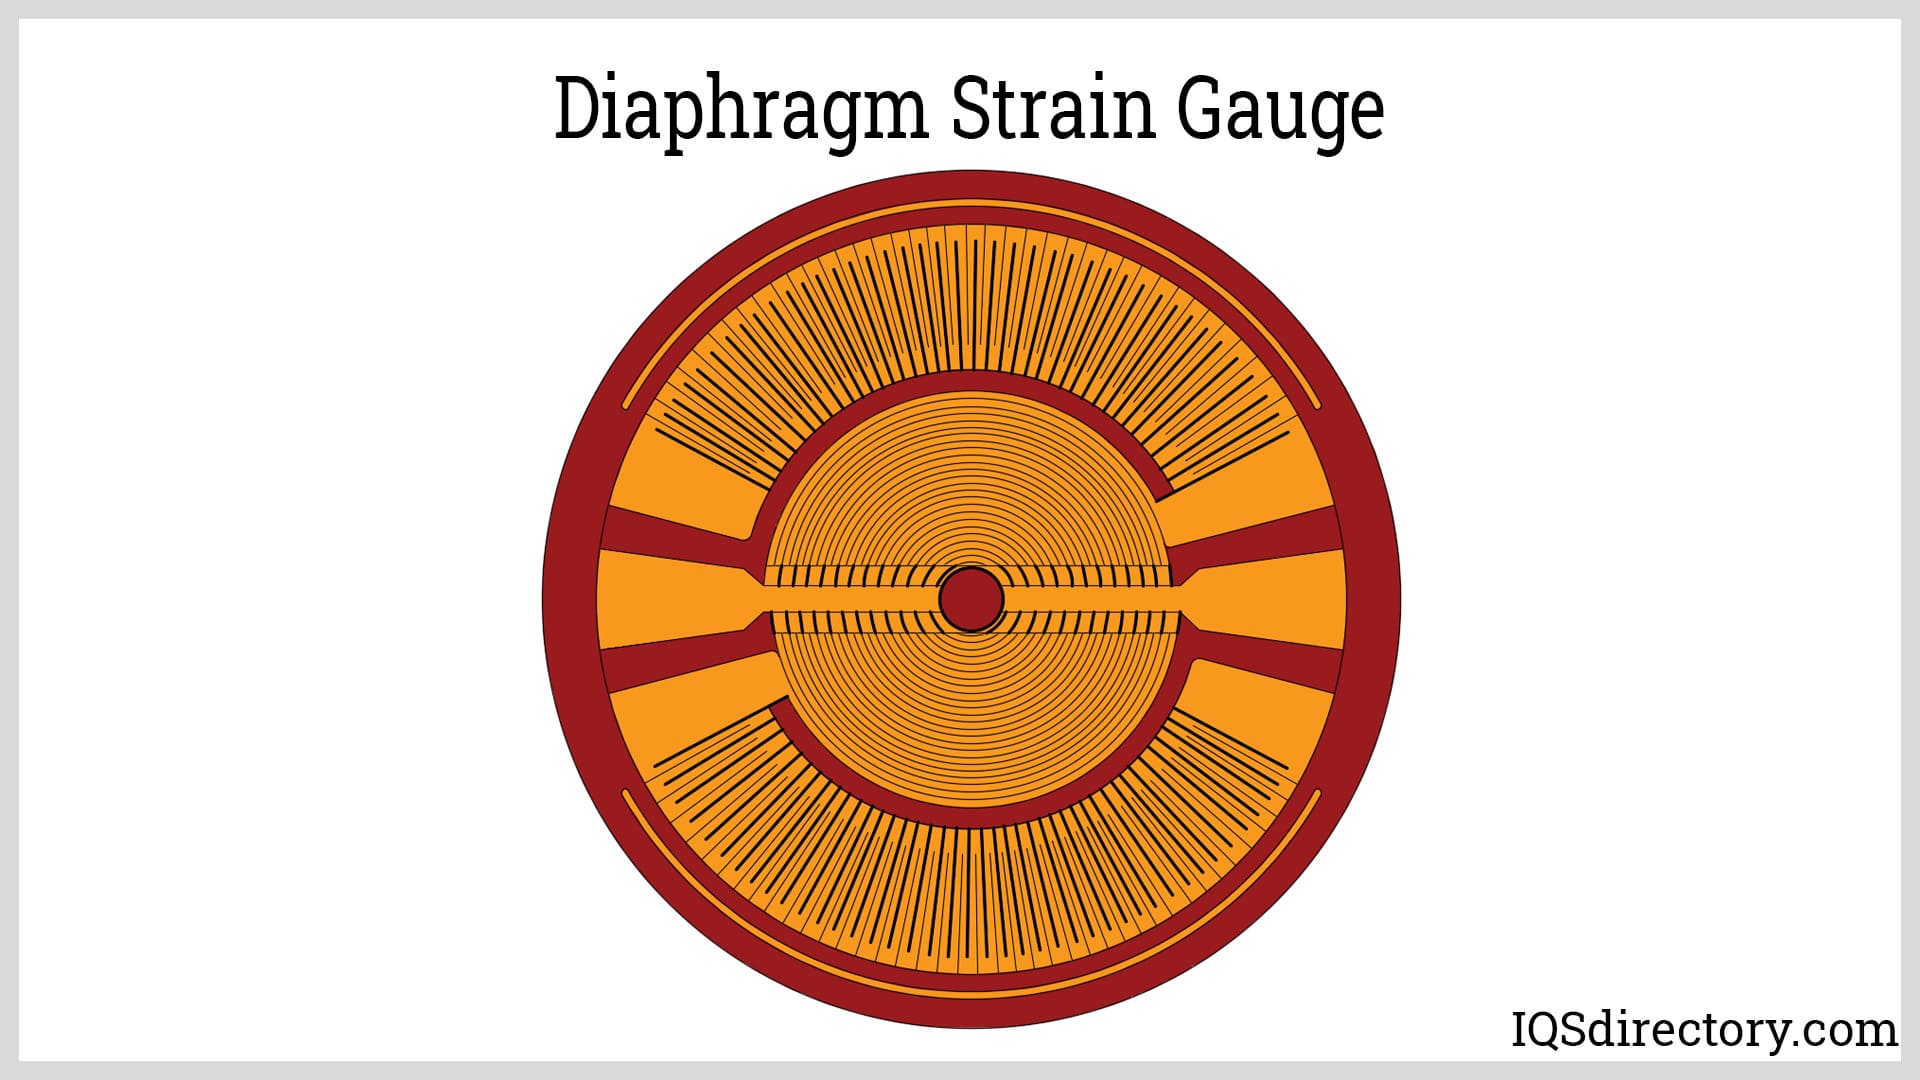
Diaphragm strain gauges measure radial and tangential strains in structures such as columns, beams, or shafts. They are commonly arranged in a full-bridge circuit. The four measuring elements are typically configured in either circular or linear patterns. Tangential elements are placed near the periphery of the carrier, while radial elements are bonded closer to the center.
In addition to the bridge circuit and strain gauge arrangement, several other important factors must be considered when selecting a strain gauge. A significant portion of the engineering design focuses on these additional criteria.
The strain gauges described throughout this article are made from metals. Metal strain gauges can be further divided into wire-wounded and metal foil types. The wire-wounded type is the earliest form of the device. Today, metal-foil strain gauges are the most common type. They are manufactured through photochemical etching or circuit printing. Some raw materials used for producing metal strain gauges are copper-nickel (Constantan), nickel-chromium, and platinum alloys.
In addition to metal-based strain gauges, there is a second type known as semiconductor strain gauges, which use semiconductor materials like silicon and germanium. Unlike metal strain gauges that operate based on changes in geometry, semiconductor strain gauges function through changes in electrical properties.

Semiconductor strain gauges rely primarily on the piezoresistive effect, which causes significant changes in electrical resistance and, consequently, a higher voltage output. This makes them particularly effective for measuring very small strains. However, they have some drawbacks, including sensitivity to high temperatures, brittleness that can make handling challenging, and non-linear resistance changes.
Strain gauge mounting is typically classified into two types: bonded and unbonded.
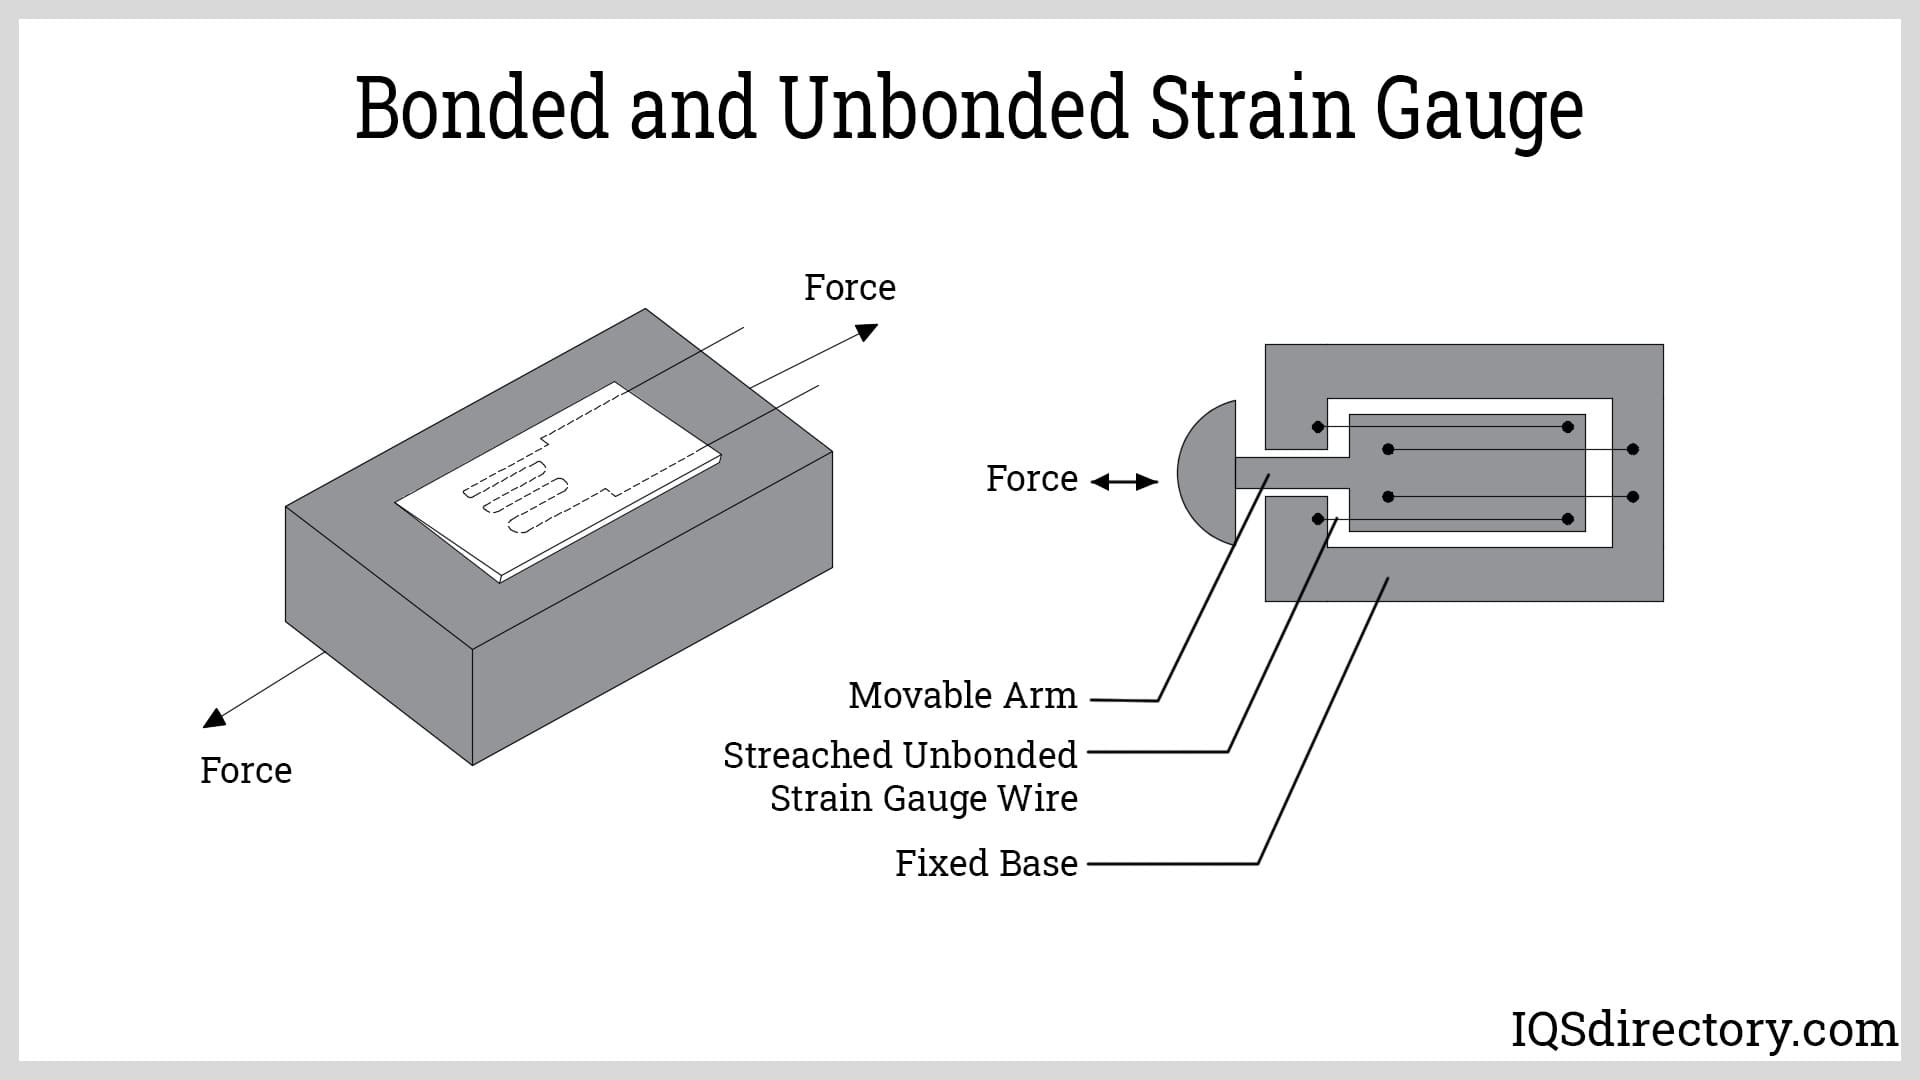
Unbonded strain gauges are less common and are primarily used in transducer applications. They consist of a thin wire, with one end attached to a rigid frame and the other end connected to a movable carrier. The wire is preloaded and secured using a spring-loaded mechanism.
Strain gauges with multiple measuring elements offer two main construction options: planar and stacked. In planar strain gauges, the measuring grids are positioned side by side on a single plane. This arrangement provides more accurate results because both grids are equidistant from the axis of the structure.
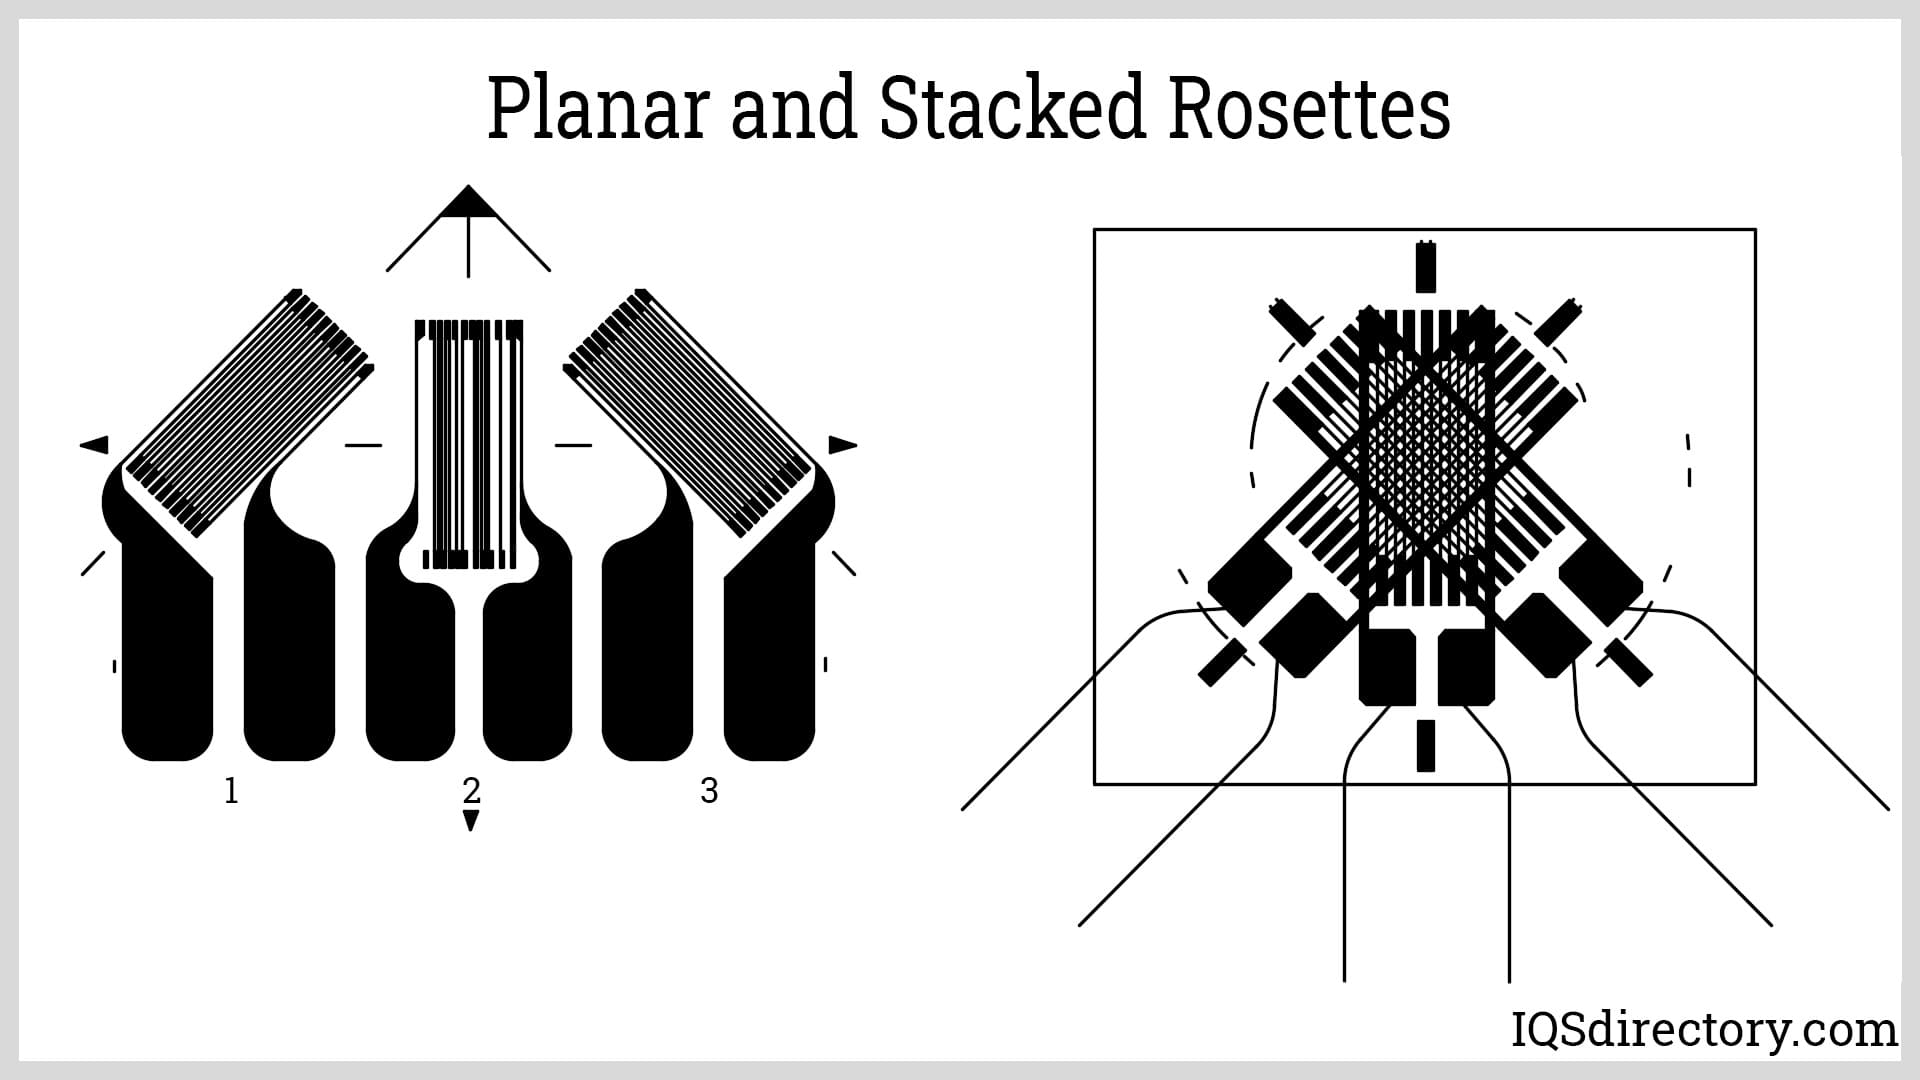
Stacked strain gauges feature measuring grids arranged one above the other, with a slight offset that makes them non-coplanar. This stacked design is ideal for applications with limited or restricted mounting space.
In practical applications, both strain and temperature affect the resistance of the conductor. Since the goal is to measure strain, temperature changes can act as an interfering factor.
In addition to temperature, creep can affect the reading of the strain gauge. Creep is caused by prolonged exposure to load. It alters the mechanical properties of the conductor, carrier, and bonding adhesive, which leads to a change in output. Transducer designs aim to minimize the effects of temperature and creep to maintain accurate measurements of mechanical load.
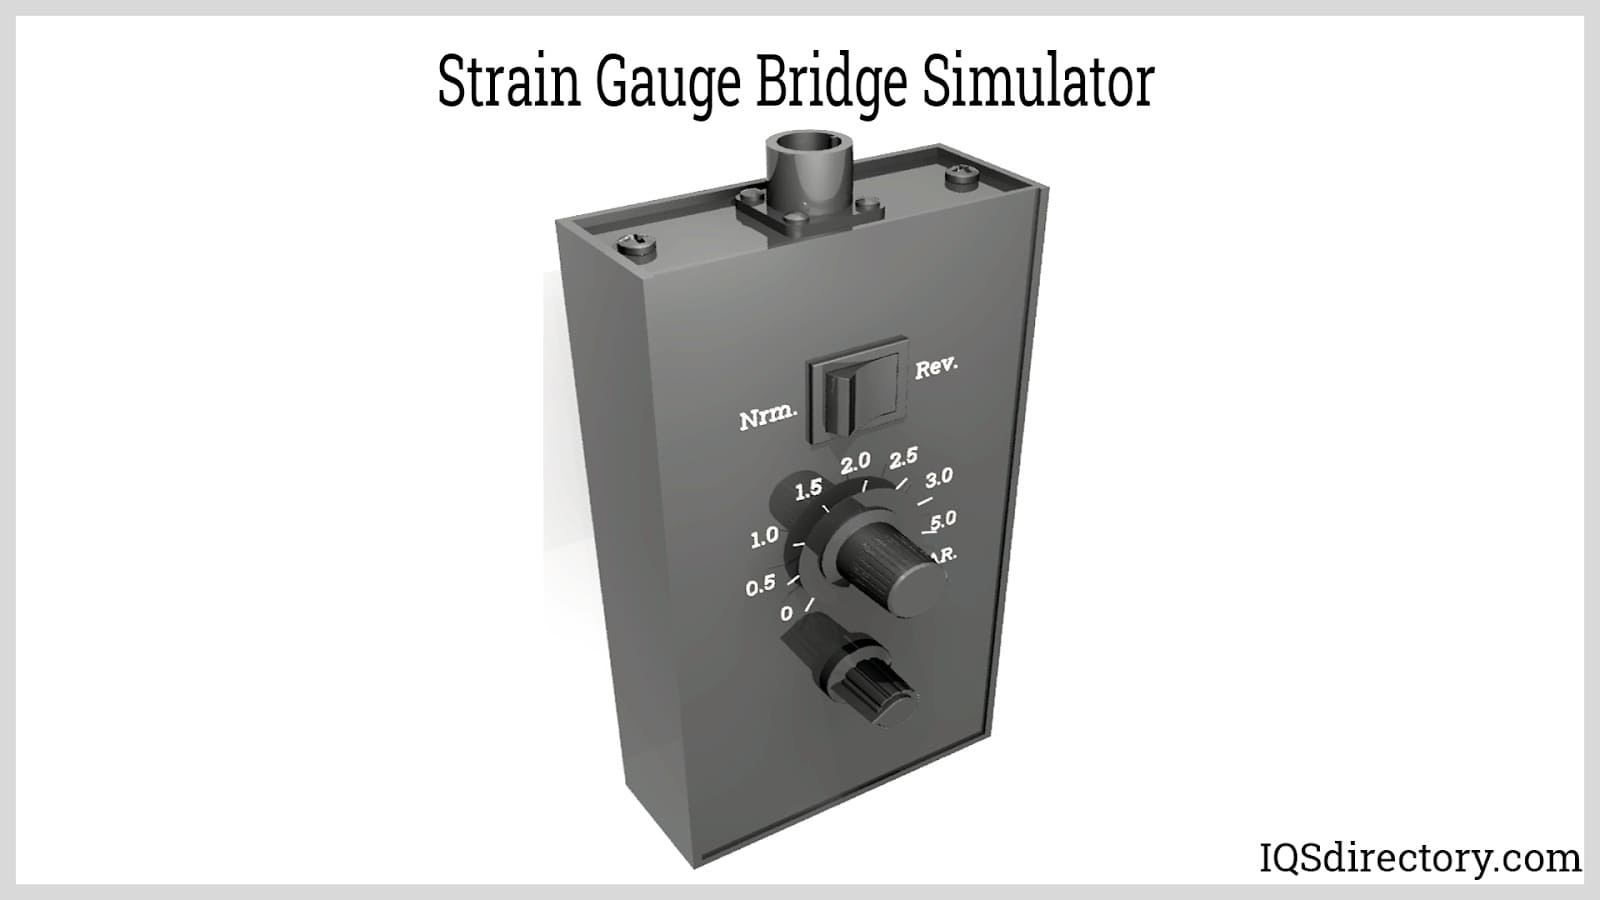
Several compensation methods are outlined below.

Force sensors are transducers that transform mechanical input forces like weight, tension, compression, torque, strain, stress, or pressure into an electrical output signal whose value can be used to...

A load cell is a transducer which converts mechanical energy (tensile and compressive forces) into electrical signals. There are different transducer operating principles that can be utilized to convert forces...
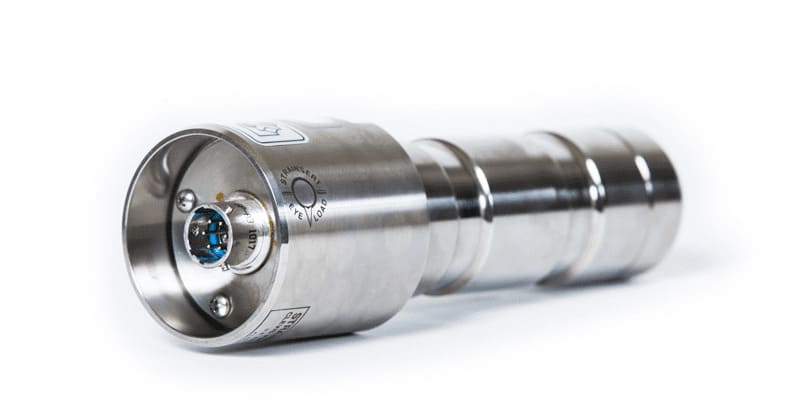
A load pin is a sensor utilized to measure force or weight in various research, control, measurement and testing applications. The load pin force sensor converts a force into an electrical signal. The load pins provide...
At the heart of every weighing device is a sensor called a load cell. When an item is put on a load cell, it senses the force of the gravitational pull of the weight, which an electronic circuit processes to display...

A platform scale is a scale that measures the weight of objects loaded on a flat platform. The function of the platform is to transmit the weight of the object to the internal measuring device and to support the object during weighing...